
Introduction
Now that I can take pictures of lightning I decided that I also want to be able to trigger my camera with sound. The design I came up with has the following features:
- Controlled by a PIC micro (PIC16F886).
- Adjustable sensitivity
- Adjustable delay – i.e. the user can set how many milliseconds after the sound event the picture should be taken. (My uncle says it would be a lot better if there was a setting to define how much BEFORE the event it should trigger the camera – but that’s another project – for my Nobel prize later this year…:)
- Operated from battery and/or external power brick.
- Completely decoupled from the camera by opto couplers, so that no harm can be caused by the circuit to the camera.
- Can be used with any camera that has a remote control input (direct, IR or otherwise).
- Can also be used to trigger any other electronic device, e.g. flash

If you like this project and would like to build it yourself all the necessary information on it is below. If you don’t feel adventurous enough to build it yourself but still would like to have it I can prepare you a kit or a fully built unit – drop me a line for more info.
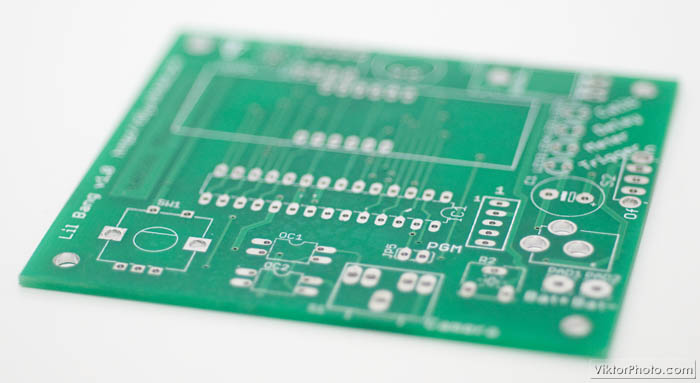
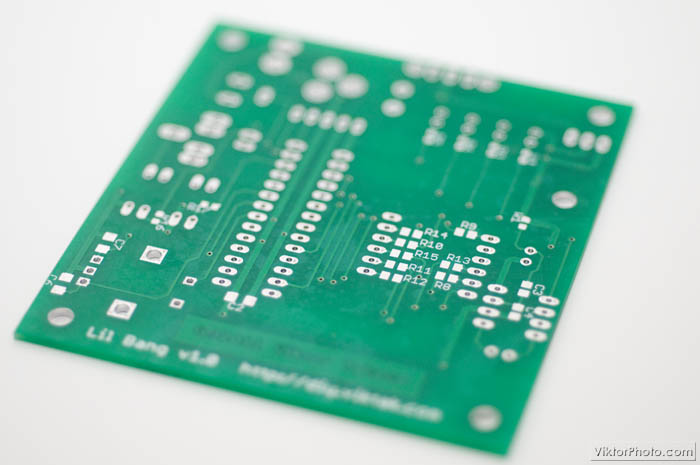
Hardware
The hardware is made up of two distinct parts: analog input circuit and digital processing.
The sound signals are picked up by a small microphone recycled from an old tape recorder I got rid of recently.
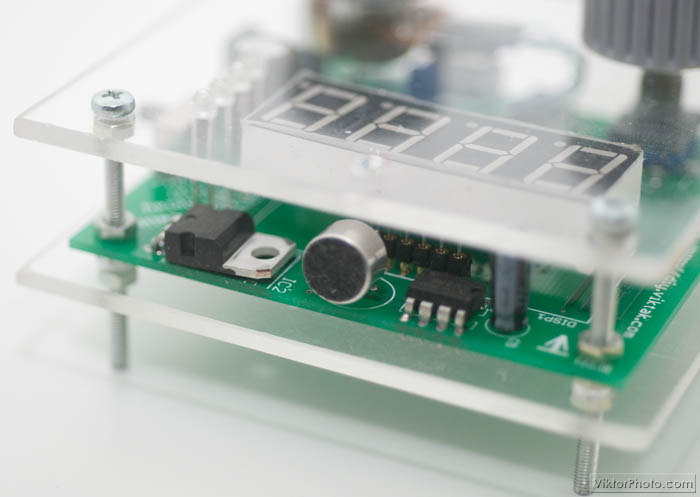
After a lot of research on the internet and some trial and error I settled with the LM386 as the input amplifier. I used the typical application circuit for maximum (200) gain from the datasheet to make sure it has enough sensitivity to pick up the smallest noise if needed.
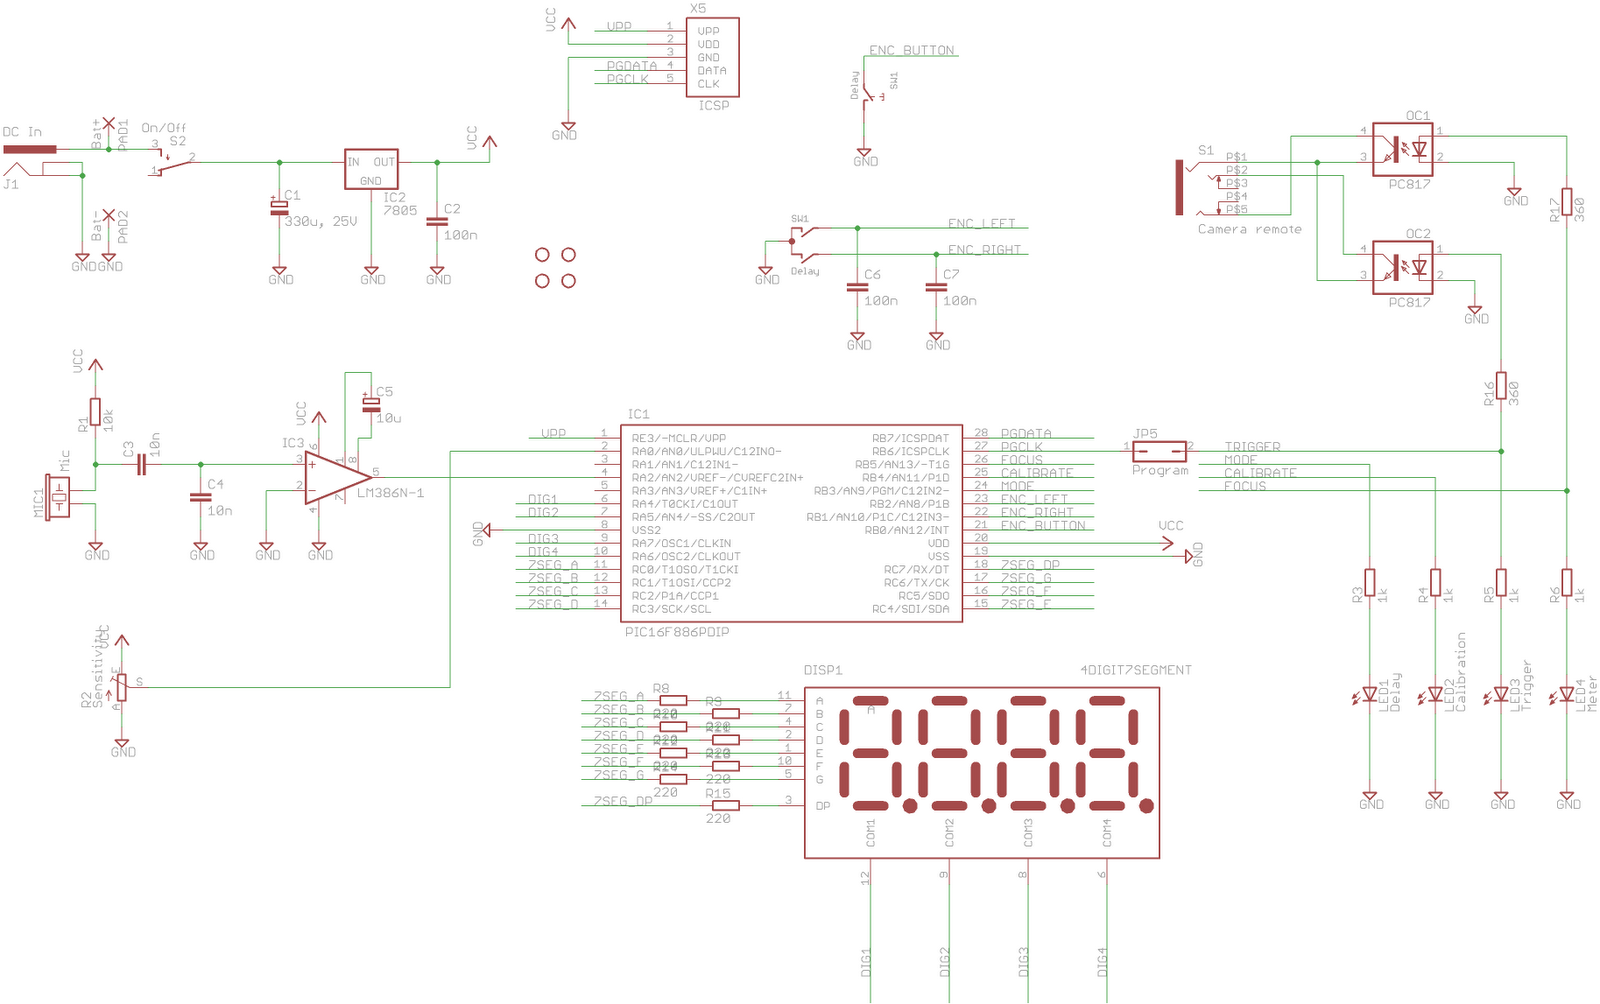
At the core of the circuit is a PIC16F886 microcontroller doing the rest of the work. The output of the audio amplifier goes directly to one of the comparator inputs of the PIC. A reference voltage is set using a pot (R2). The internal comparator is used to decide if there is a high enough signal coming from the microphone. If yes the shutter is triggered.
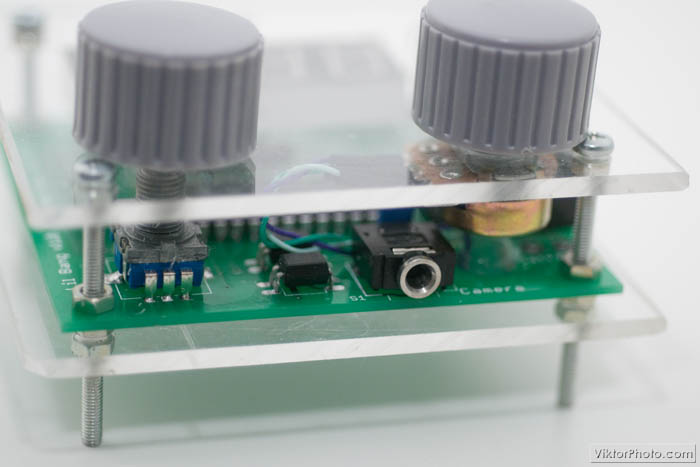
The camera is connected to this circuit through a standard 3.5 mm stereo jack. I used the same pin layout as in the lightning trigger project so that I can use the same (modified) cable release.
The circuit is, as always, electrically decoupled from the camera by two opto couplers.
Operation
A short demo of Lil Bang in action:
Unfortunately, there is a bit of latency between the picture and the sound of the video and the trigger seems to trigger before the sound event. Obviously, this is not the case. But you still get the idea, don’t you?
After start-up the device is in calibration mode. Here the user can set the sensitivity of the circuit. The calibrate LED blinks every time it would trigger the camera if it was armed. This way it can be easily set to the desired level by using the pot (R2).
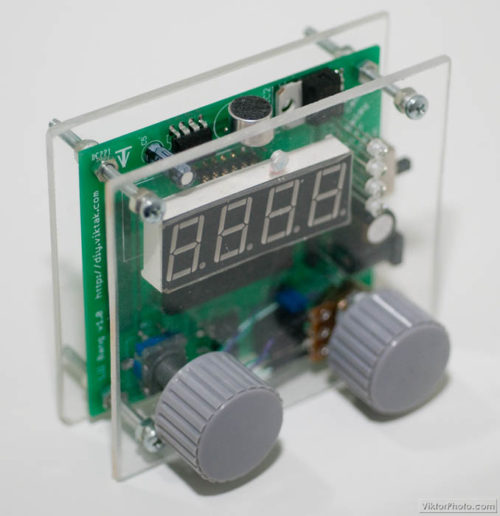
Once the desired sensitivity is set, pressing the Mode button (which is the built-in button of the rotary encoder) will take us to the next setting: Delay. Here the user can set up a certain delay he or she wants to have between the sound that triggers the shot and the actual shot. The delay is displayed on a four digit 7 segment display, in ms (milliseconds). At the moment, any value 0-255 ms can be selected using the rotary encoder. This is enough for my purposes, so I didn’t bother writing the code for higher numbers. If there is demand for higher numbers I will implement the necessary changes.
Once the desired delay is set another click of the Mode (rotary encoder built-in) button arms the device. In this mode the camera is put in metering mode (although it is recommended to use the camera on manual settings to avoid any unwanted delays when the triggering event happens). Any sound that is loud enough to light up the calibration LED in calibration mode will trigger the camera after the pre-set delay.
Another click of the rotary encoder button puts the device again in calibrate mode.
To save on power consumption the delay amount is only shown when it can be changed.
You can download the source code from the project’s repository.
Possible applications
- high speed collission photography, such as http://www.diyphotography.net/creating-the-splash
- high speed explosion photography, e.g. http://www.flickr.com/photos/28028849@N02/2812713225/
- remote control – you can trigger your camera by clapping or making noise otherwise to eliminate camera shake
Note: The above links point to other people’s photos that were not made with my trigger. I included them for illustration purposes only.
Some sample photographs from photographers using the above trigger
Fredric Frennessen capturing color bounced off a speaker:


George D. capturing a “storm in the glass”:

Rich Johnson creating a water hat for the family:

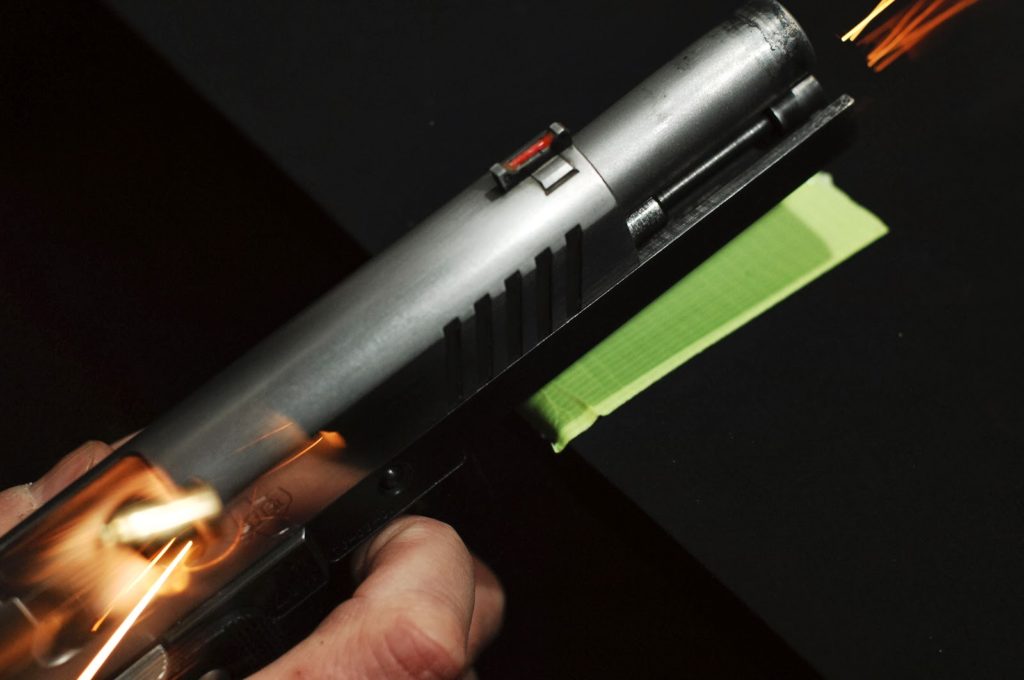
Claus and Christian Christensen managed to catch a bullet:
Update 6/8/2013
I just won Lifehacker’s “Best Camera Hacks” competition with this entry!


Nice work.I haven't seen your schematics,but it seems to me that if you incorporate some kind of pulse stretcher with an adjustable pulse width,your beautifully made trigger could be used in a wide range of applications beyond photography. Excellent. Keep it up.
Rick in PDX
What other applications do you mean? I think I could modify the firmware for stretching the pulse even without changing the hardware (although it would be nice to have a dedicated LED for that setting). I would love to hear more details on this from you.
Thanks for stopping by!
I'd really like a kit or fully built unit. Let me know how much and where to send the money. omegaangel at excite dot com. Thanks!
Answer sent in private mail.
I'd like one too. Please send me price and PayPal email and I'll shoot you some cash. Why reinvent the wheel…you've done a great job and the trigger looks cool too. JaredTennant at gmail or http://www.JTpics.com
Answer sent in private mail.
Hi, this is really nice project.. I am kind of working this kind of project but i stuck on the software side.. I'm just wondering if there is any way to i can get the source code.. I will really appreciate that.. thanks
Ahmet, please send me a private e-mail and I will send you the code.
Regarding your Uncle's desire to trigger *before* the event happens I'd say not all is lost – the devil is in the detail, as always 🙂 . Say, you're taking a picture of a bullet hitting an apple. Move the mic closer to the rifle than to the apple and it might just trigger before the bullet hits the apple. But that's probably the only shot I can think of like that. I hope your Uncle is into firearms 🙂 Everything else really does require a time machine to trigger before the event happens … Bummer!
Sorry, I was thinking of your Uncle and forgot to ask the question I had 🙂
I see a Focus output on the schematics. Does that mean that you're not using manual focusing mode to shoot high speed triggered pictures? How does that work? I thought the camera's AF mode is going to be way too slow for that? Or is this used for something else?
Great job on the project and the PCB!
Cheers!
:-)))
That output is probably wrongly named focus. What it really does is pressing halfway the shutter release button. You are right, the camera has to be set on all manual mode. I should have named it something else, like "arm" or "ready"…
I'd love one in my kit. Please send me price and PayPal email as this is absolutely awesome. Great job with your product mate ! 🙂 – Let me know – sharaldsted@gmail.com
Message sent in private mail!
I'd love to have a kit or a built unit (and possibly also a lightning trigger). Please send me price and Paypal info. Thanks!
Please send me an e-mail and I will send you the details!
my address is vadasg att gmail dot com… thanks!
Message sent!
Hello, my name is Marco, I'm from Brazil and I really liked his project, he is much "lighter" than the others I have seen on the web.
I wish I nandasse the price and mode of payment to my address which is mpenharbel att yahoo dot com dot br.
Message sent in private mail.
please
where is the source code?
Send me a private mail, and I'll send you the code.
fototeo@in.gr
thanks
I just sent you the sources.
Hi Vitya, I would love to purchase this kit as a made up unit please.
crowabbey@hotmail.com I will pay by Paypal.
Many thanks,
John in Ireland
Private mail sent.
Plz send me code.
rajsurve123@yahoo.co.in
Thnx
I just sent you the sources.
Hi, I´m doing a similar project, but it´s not microcontrolled. Can you send for me too the code. I want to learn how to program a PIC for that. thanks.
alyssonapm@yahoo.com.br
Code sent in private mail.
This is exactly what I'm looking for!! 🙂
However, electrical isn't my thing. Could you please let me know what it would cost me for you to send me one 🙂
ieffallan@live.ca
Thanks
Jeff
Jeff, private mail sent.
Your e-mail address seems to be incorrect:
Final-recipient: rfc822; ieffallan@live.ca
Action: failed
Status: 5.1.1
Diagnostic-Code: smtp; 550 Requested action not taken: mailbox unavailable
Last-attempt-Date: Sun, 01 Apr 2012 01:29:42 -0700
Sorry about that, I typoed. Should be a "j" Jedda LAN@live.ca
Thanks again
Jeff
Oh for the love of… Stupid auto correct let's try this again
jeffallan@live.ca
Oh for the love of!!! Stupid auto correct!!! Let's try this one more time
jeffallan@live.ca
Thanks again
Jeff
Sent again! 🙂
I'm also interested if you have the capability to sell as a project. My e-mail is kd6not at amsat dot org.
Thanks
Private mail sent.
Very nice work. I am interested in purchasing this device but would like not to post my email publicly.
Please send me a private mail. You can fin dmy address on the contact page.
Very nice work. I am interested in purchasing this device.
I would love to purchase this kit as a made up unit please.
Please send me price and Paypal info. Thanks!
p.mueri@swissonline.ch
Hi,i like your project and would like to emulate it and add other applications of the circuit for emergency and natural disasters.
Could you please help with the source code for your MCU? thanks
email: nofreewifi4u@gmail.com
Private mail sent with info.
Very, very nice project! This one and the Zeus Lightning Trigger!
Can you pls send me the source codes? Thanks a lot in advance, Vitya!
drkkwell at gmail dot com
I would like to buy/build one also.
Nrbrtmuller@gmail.com
Private mail sent with code
Private mail sent with info.
Very nice. Would it be possible to purchase one of these units? Vormercabinetry@gmail.com
Private mail sent with info.
Hi dude, you did excelent work here! 🙂
May you send me a source code for MCU and PCB design? Or something of this?
Email address is:
3sprej [at] gmail [dot] com
Thank you very much!
Thanks for the nice comment! Private mail sent with info.
This looks just what I am looking for
I assume it will trigger a flash unit as well as a camera?
Could you please send me the details for you to build and send me one please?
rogerchapman@talktalk.net
Thanks
Private mail sent with info.
Hey there !
This is … impressive. I'd be interested in buying one, if possible.
Here's my mail : clicpatapon@yahoo.fr
Thanks !
Private mail sent with info.
Fantastic work, really impressed
I'd love to build one
can you send details, thanks
mark@doubleyolk.co.uk
Private mail sent with info.
i'd love to have one, send me price at reneepicasso at yahoo dot ca
Private mail sent with info.
Hi, this loks fantastic. Might be beyond my capabilities though… could you let me know how much it would be to buy a fully built unit? My email is johnmowatt@hotmail.com
Many thanks
Private mail sent with info.
Vitya,
Thanks for the interesting projects that you have come up and shared with everyone. I'm also interested in seeing the source code. Please send it to noel_arcilla@yahoo.com. Thanks.
Private mail sent with source code.
very interesring project. Can u send a source code? my email is
magnel@hotmail.es
Thanks
Private mail sent with source code.
I would love to purchase one of these from you. If your willing to make me one. Please let me know the fee and How I should procede. I could use it asap since I just burnt out my 30 year old unit. Yours looks perfect… je135 at mac dot com
Private mail sent with info.
I would very much like to have one of these units. Either pre-made or as a kit.
Please write me at "gyssedk at gmail dot com"
Hey I would like to get one of these sound-based camera triggers. Yours looks like the nicest one that I have seen so far. Let me know what would be required for me to have one set up. You can visit my website at forum.goodshooter.com to see what I would like to use it for.
Private mail sent with info.
Private mail sent with info.
My email is JerodRayPhotography@gmail.com Send me the pricing details for the sound trigger.
Private mail sent with info.
I would like to purchase a ready made unit from you like all these other folks!
-rang
email is:
tang1@san.rr.com
Private mail sent with info.
I would like to buy/build one also.
please send me the prices and details to jchristians@gmail.com
Hello again,
my previous post was incorrect, I would like to buy/build one also.
please send me the prices and details to jcfotografie.nl@gmail.com
Private mail sent with info.
Great Project! Could you send me buy/build info to ironsmith@gmail.com
Thanks
Thanks for the code. It would be possible to have the pcb design?
Private mail sent with info
I'm afraid I can't send it to you. However, you have the full schematics above so you can design your own. Also, my PCB is designed with parts I have, so it wouldn't do much good to you anyway.
This is a great projekt….. nice work….
Could you send me the source Code too? Thx
kontakt@marfi.de
Greez Marfi
Private mail sent with source code.
Hi,
This is really nice. I'd be very interested in buying one of these. Is that possible? Please let me know.
Thank you
hz93@hotmail.com
Private mail sent with info.
Hi, I think I may be interested in buying one !
Could you please send me the price at wax[at]wcshoot.com ?
thx
Hi,
I am from India. is it possible to have a complete kit set of the gadget? Payment for that can be arranged through paypal. Mine is debasisslg@gmail.com
Thanks and regards-
DS
Hi Viktor,
Great project. Is there any chance that I can get a few PCBs (3) for this project? Can arrange payment through paypal. Also I will need a copy of the source code. My email address is gareth.franklin@gmail.com.
Thanks!
Regards,
Gareth
Private mail sent with info.
Private mail sent with info.
can you send me the code?
lycwd_01@yahoo.cn
thx!
Private mail sent with code.
I would like to buy/build one also.
please send me the prices and details to quanghungphung@gmail.com
Private mail sent with info.
Hi , i want to buy one , my mail adress is emrearicanphoto@gmail.com can u say price to me..thank you
Private mail sent with info.
Good day, love the design I would be interested in purchasing one. It would be a great teaching tool for some of my high school classes. I've been looking for something like this for a while. a.doliveira@live.ca can you please let me know your price and I'll you know if it is in out budget. Thanks in advance!
Could you send me PIC codes thank you. candok96@gmail.com
I am from India I will also like to have pl quote the price and paypal detail.
email– nalinisuman@hushmail.com
Private mail sent with info.
Private mail sent with code.
Hi love your project, could you send me details of the kit and fully build price email is adrwebs@gmail.com thanks
Private mail sent with info.
Hello,
What an amazing little gadget! Could you send me details of the kit and the built price too please? – windswept321@gmail.com – I'm in the UK.
Thank you
Private mail sent with info.
Interesting project. Will you send me purchasing details?
Please send me your e-mail address. Thanks!
Hi , i want to buy one , my mail adress is andri.revelino@gmail.com can u say price to me and with Delivery price too coz i'm in Indonesia… Thank you
Private mail sent with info.
Hi, very nice project, can you send me the pic code and pcb? Thank you
My email is : bobo_bobo06@yahoo.com
Private mail sent with info
Hi
I'm trying to get in to high speed using a motion sensor and this looks ideal.
Could you email me with a price for an assembled and unassembled kit.
My email is hoodj108@gmail.com
Thanks
James
Private mail sent with info.
Hi Viktor
This looks like a great project. I would also like to know what the cost of the kit assembled and unassembled. As a kit would the pic be pre programmed?
Thanks
Wally
Please send me an e-mail or leave your email address here for details. Thanks!
wyee255@gmail.com
Private mail sent with info.
Could you please send me the pricing for a built kit? Thanks!
Please send me your e-mail address. Thanks!
Hey – amazing work. Please let me know your price for a built kit at tildame at hotmail dot com.
Private mail sent with info.
scotwilson84 at gmail dot com
Private mail sent with info.
i'm interested. rnrdiez at gmail dot com
Pingback: DIY 3D Printed Camera Dolly with Pan and Tilt Head – Viktor’s DIY Blog