
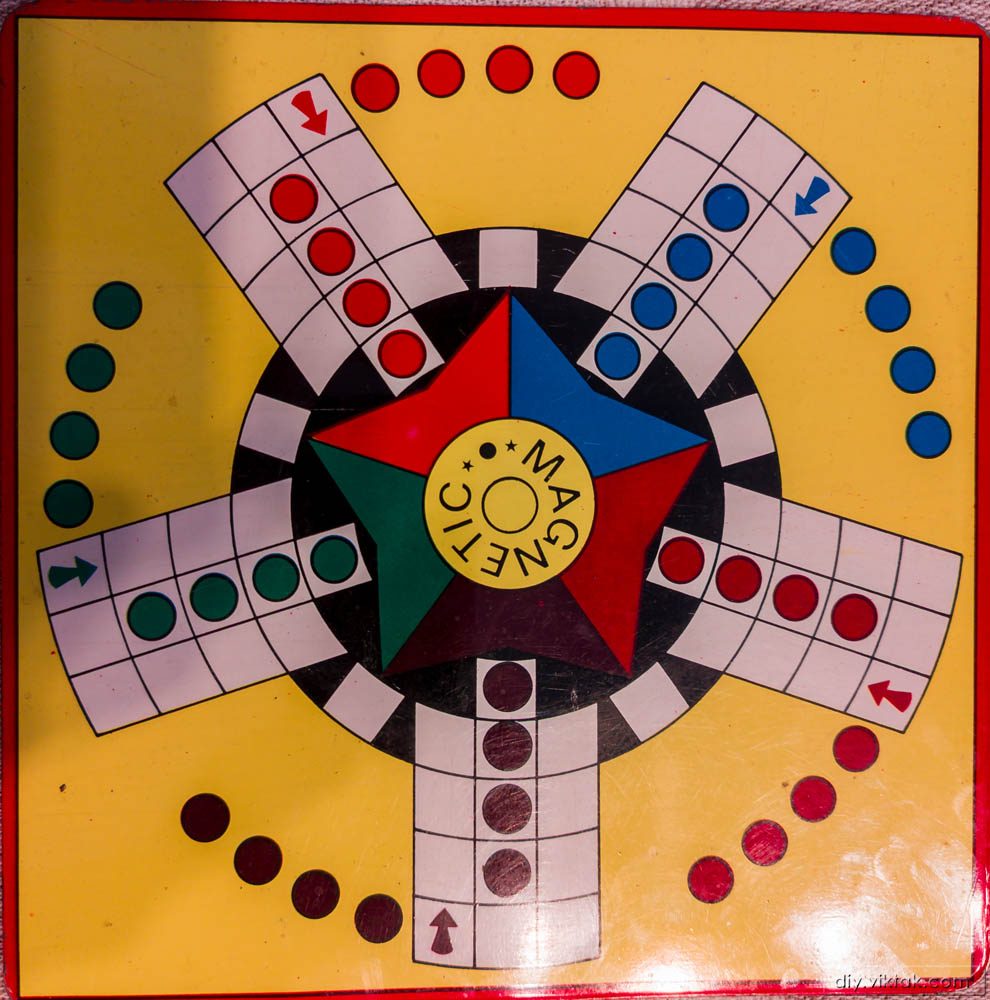
Remember the old board game, that we all probably played as kids? Where you have four tokens to guide through a(n essentially) circular board to bring them to safety having a die as your only vehicle/weapon/armor? In different countries it is known under different names. In English it is known as Ludo, as far as I know it. In Hungary, where I grew up, it even has several names, like “Ki nevet a végén?” (Who laughs at the end?), Kocog és kidob (Jogs and kicks out), “Ne nevess korán!” (Do not laugh too soon”). In Greece is called “Γκρινιάρης” (Complainer/Whiner). It can be played by two to six players, usually, and guarantees a fun night in for kids and adults alike. I used to play it a lot (almost half a century back), but then I slowly forgot about it. It wasn’t until a couple of months back when a friend reminded me of it and I felt like playing it a bit, for old times’ sake. That’s when the idea of bringing it to the 21st century was born. Below is a description of how I made an open source, micro controller operated modern version of the classic party board game.
If you are from a country where you have also played this game, leave a comment with its local name. Please make sure to give its English translation, too, so that others can learn it!
Overview
For those not familiar with the game, here is a quick breakdown of the game. Please note there are slight variations on the rules in different countries, boards, even groups of people playing it:
There are 2-6 players in the game, each controlling 4 tokens (of the same color). The tokens are starting from a “garage” position and the goal is to move them to the “finish” position along a predefined path. The players take turns. In each turn one can roll the die once, then can decide which token they want to move (if any) by that amount. If a player rolls 6, they can have another turn. If a token lands on a position where another player has a token, that token is “kicked out” and goes back to its “garage” position. You can read about the rules and gameplay here, and I will discuss it in a bit more detail later.
To bring this little fun game to the 21st century I set out to achieve the following requirements:
- The feel and look of the game should be as close to the original board (that I had) as possible. This means not changing the layout of the board, having the same amount of positions as in the original one.
- The enclosure would be 3D printed by me, so it should fit within the capabilities of my 3D printer.
- Ordinary people should be able to play this game. This means no complicated setup, no configuration, etc. Just connect it to power and go! Anything more involved should be optional.
- No external dependencies: The game, just like the original one, should be portable. You should be able to play with it at home, on the road, while camping, etc.
- At the same time, it should take advantage of modern times. Having a WiFi capable micro controller should open up a range of possibilities such as maintaining statistics, free color selection for users, load/save games, over-the-air updates and more.
When I had a quick look at the original board I used to play on, I immediately had a rough idea how I was going to realize this game: There would be a circular PCB in the center, which would hold the controller circuitry on one side and seven addressable LEDs on the other to act as the die. Then there would be an outer circle, or rather a donut shape, which would contain all the positions of the game as well as all the user controls (i.e. buttons) I needed. After a couple of design iterations, I arrived to the design that I will discuss next.
Electronics
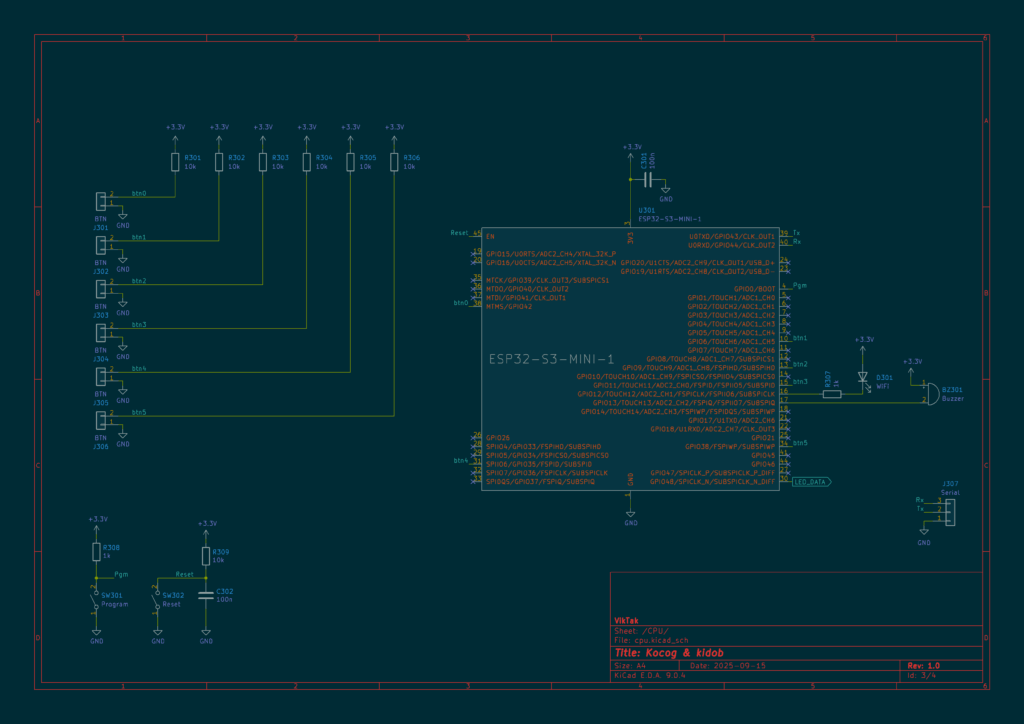
Not too surprisingly, I picked an ESP32-S3 to direct the show: The ESP32-S3 has plenty of horsepower and peripherals to run the show. All the 115 LEDs used in the board) take up only a single GPIO. Without these serially connected and individually addressable LEDs the whole project would have been a lot more difficult to make, mainly because of the space constraints.
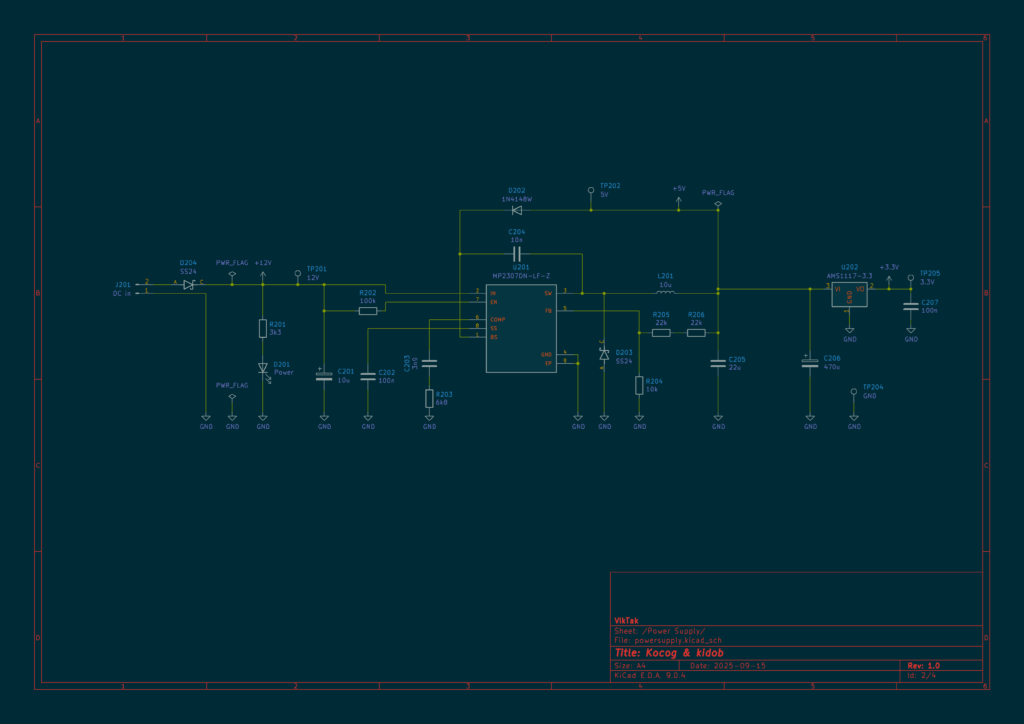
The whole circuit is powered from an external DC power supply that can deliver at least 1.6A @ 5-23V. Even a generic laptop PSU will do! For power delivery I picked a standard 5.5mm barrel connector: It is robust, widely available and adopted, durable and has only 2 cables going to/from it. I was playing with the idea of using USB PD instead, but I just couldn’t find a practical way of placing it on the PCBs. However, I realize, that many, who would want to play this on the go (e.g. on a long train/plane ride) would want to power it from an ordinary power bank that they use to charge their phones. To address the issue, I created a small dongle that goes between the power bank and the game in a small, 3D printed enclosure. But more on this later.
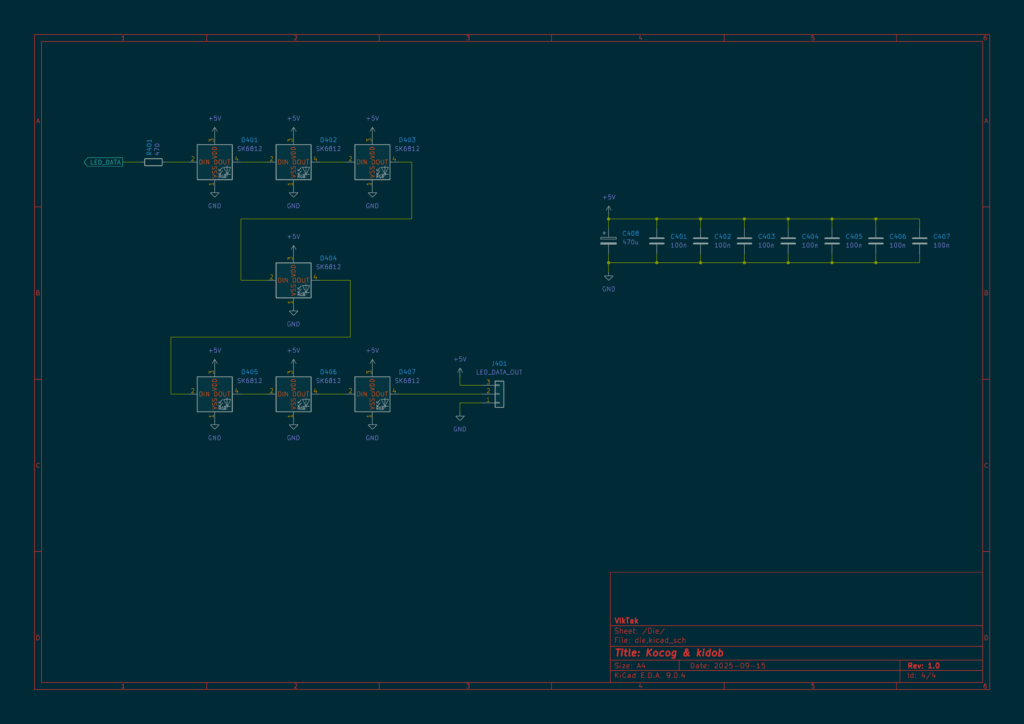
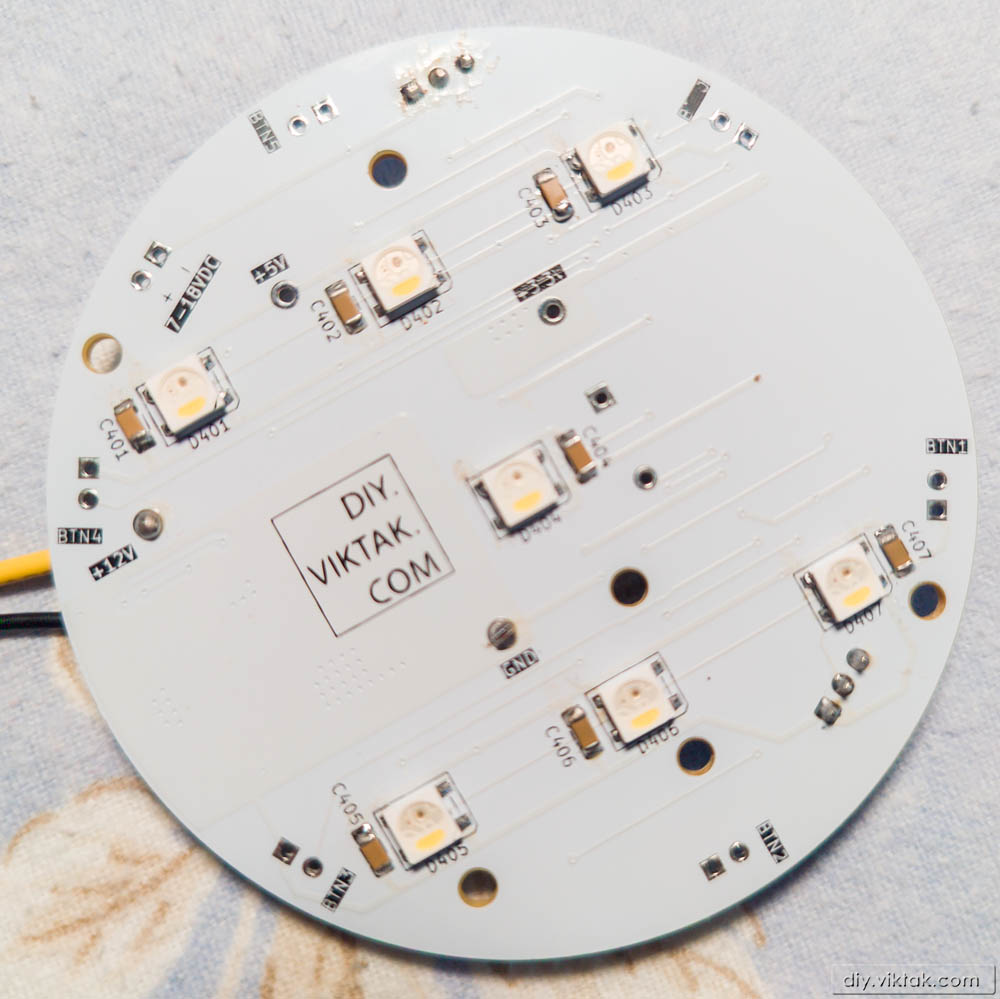
The die is simulated by seven LEDs that light up in the familiar pattern for each roll. These LEDs are the closest to the ESP32-S3, all the other ones that represent the playing field are connected to the output of the last one of these.
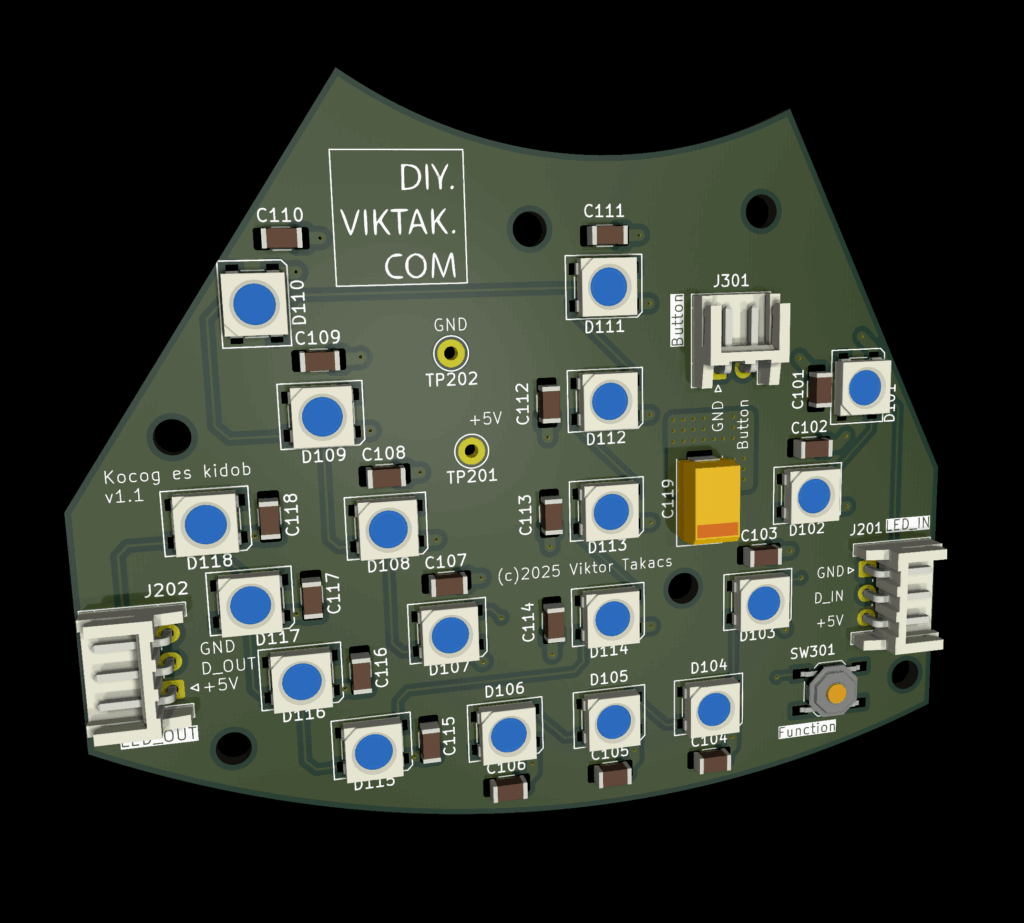
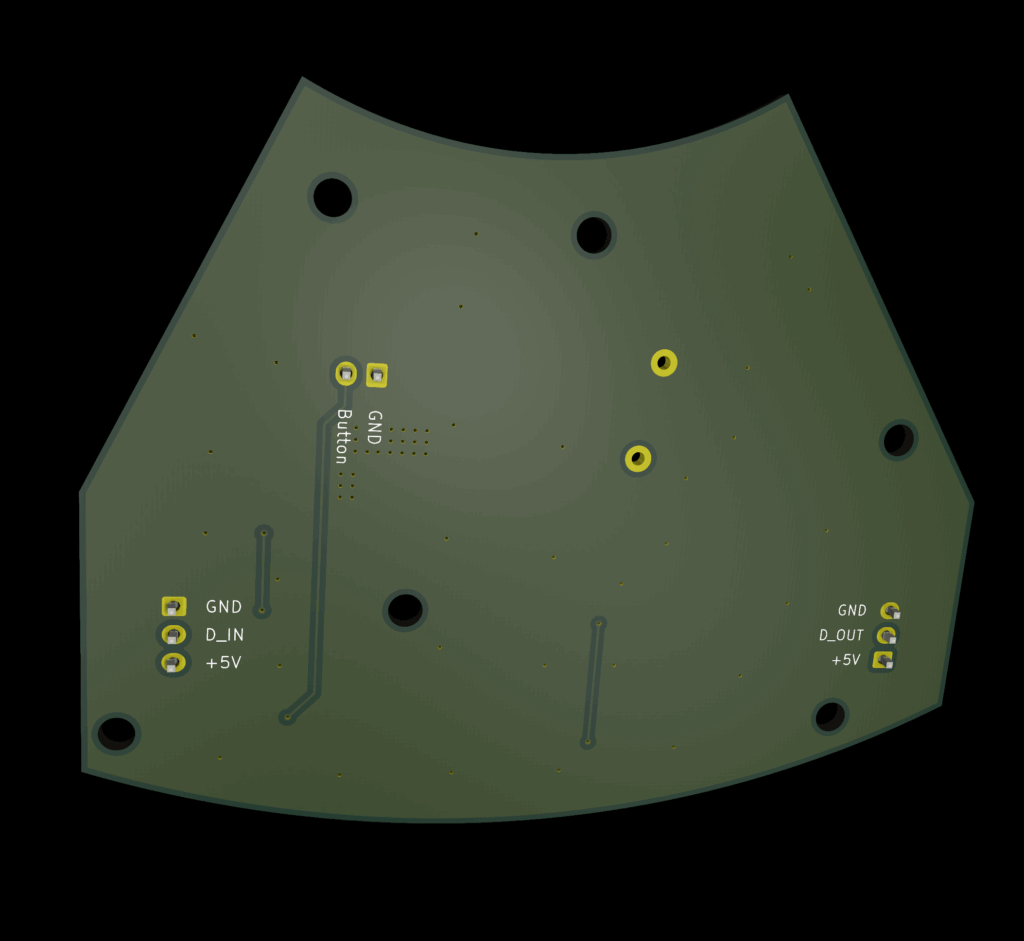
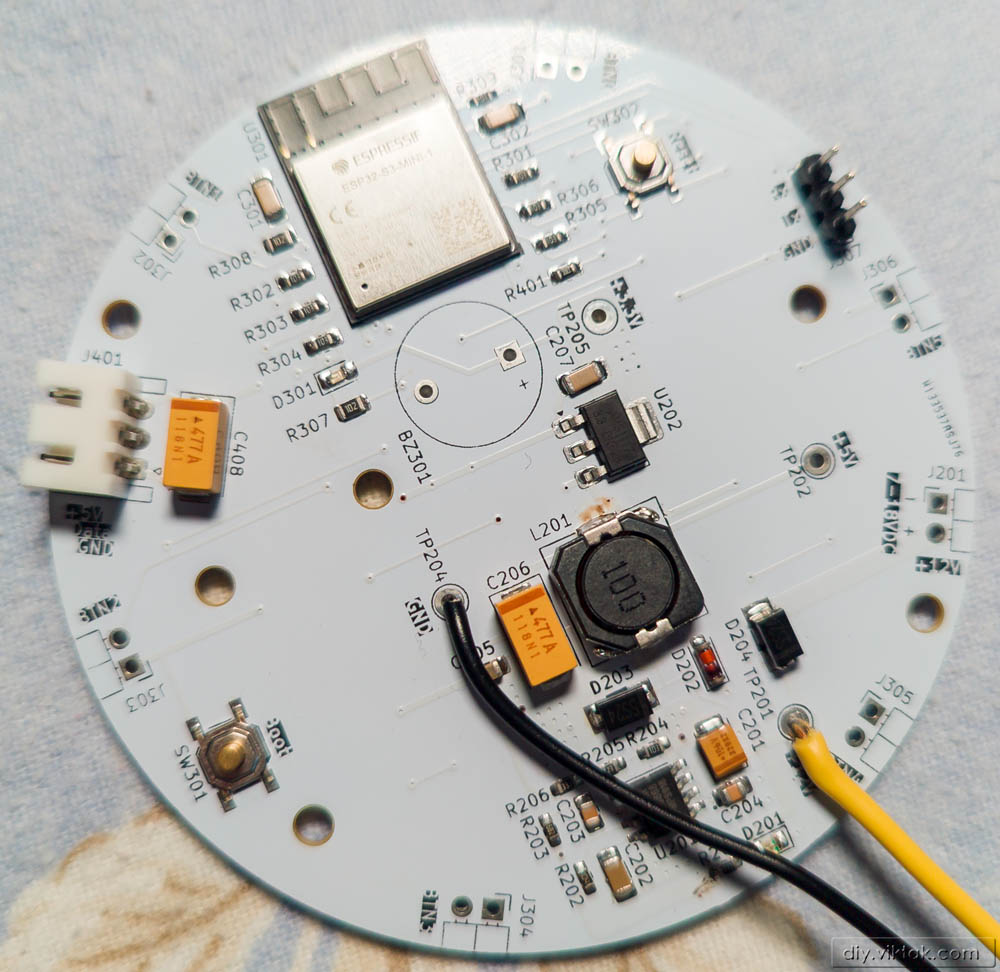
All of the above so far is on a small, circular PCB with a diameter of less than 80mm. On one side the LEDs, on the other everything else:
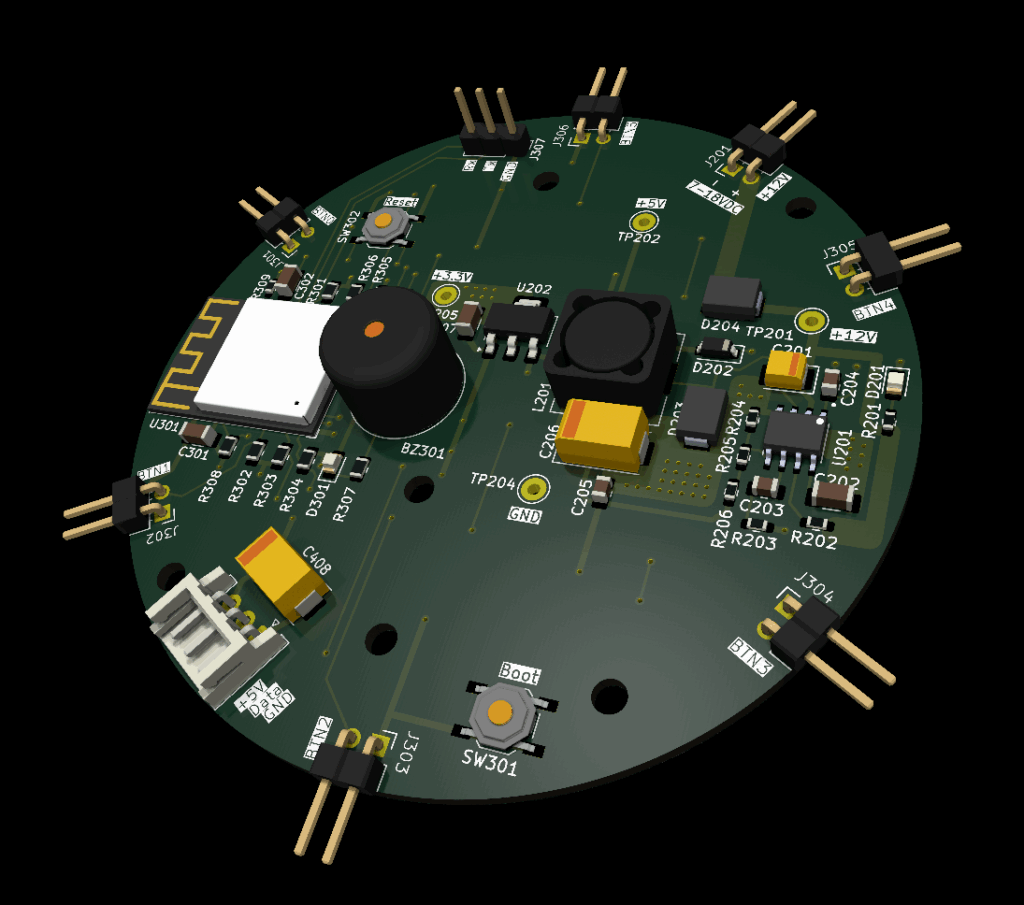
This arrangement is necessary to keep the buck converter away from the micro-controller and other sensitive digital lines, like the LED serial data lines. Also, the LED side is now free from clutter that might take away from the overall image of the game.
The header pins you can see around the edge of the board connect to the outer donut of PCB where the actual game will take place.
There is also a buzzer on the board that makes some beeps during gameplay. It makes the kind “noise” that almost all the handheld games of the eighties once used to make. This adds to the immersive retro experience 🙂
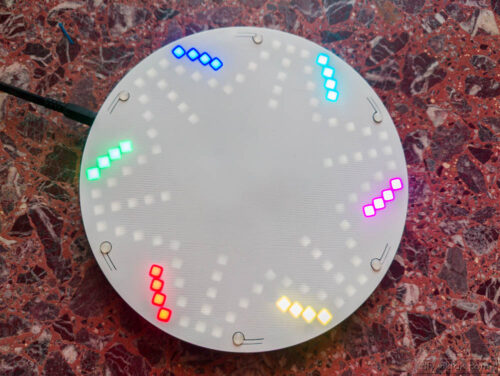
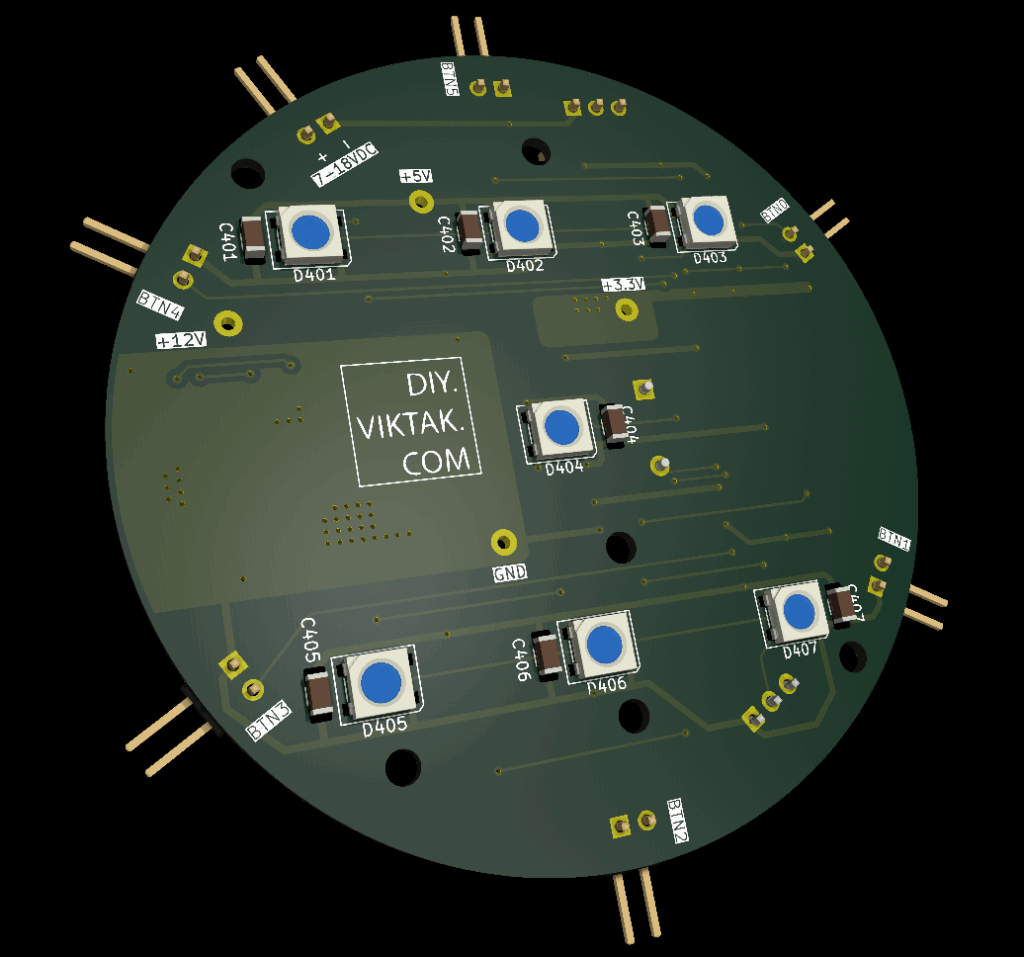
The rest of the circuit is the several LEDs and buttons that are most “visible” to the players:
After a couple of iteration I ended up with a design like this: Following the original game’s layout, the main playing field contains 10 times the maximum number of players that can play on a board. In our case, this means that there are 60 positions during normal gameplay. If you add the four garage positions and another four finish positions per player you end up with a large number of positions (108) that must fit on the board. Each addressable LED represents a position on the board. When a player’s token occupies a specific position, it is lit up in the player’s color. When it is unoccupied, a neutral, dimmed white light shows that that is a position on the board. The “garage” and “finish” positions are not lit up at all when not occupied.
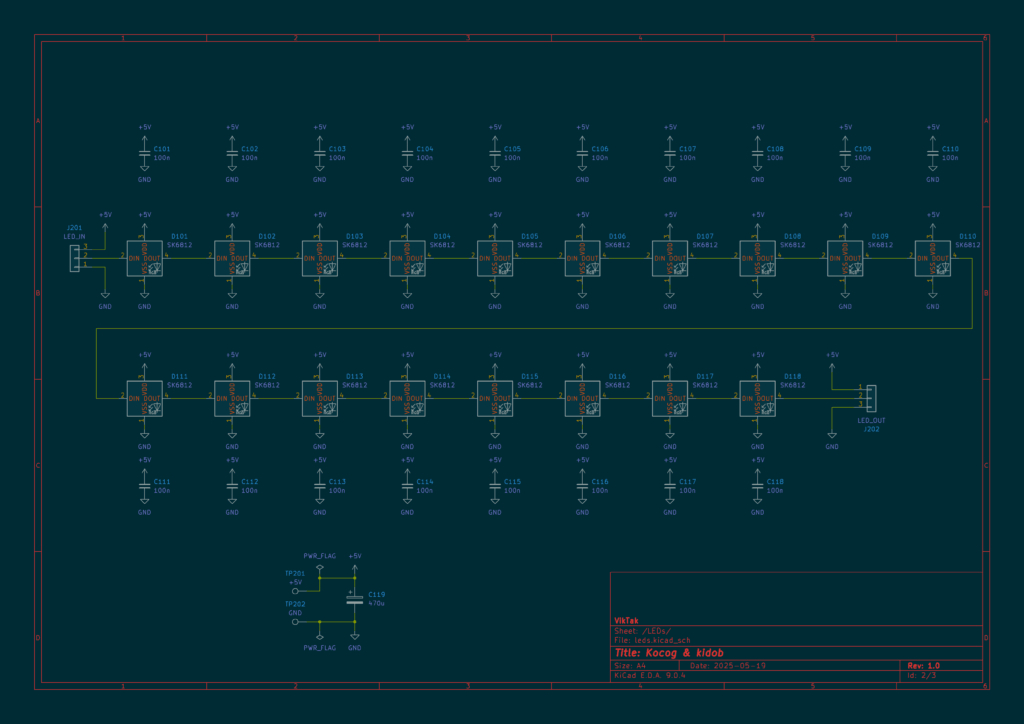
To fit this many LEDs in a circle I would need a PCB about 20 cm in diameter. However, a PCB of this size costs dearly. I am lucky enough that PCBWay sponsored this project, so I could have gotten away with such a PCB. But I wanted to create a design that would be easy to handle and more economic for others as well. So I broke up the design to six smaller sized PCBs, that fit the prototype PCBs’ specifications. A PCB less than 100mm*100mm usually costs a few euros/dollars only. Also, when ordering prototype PCBs, usually 10 pieces are created – perfect for my purposes, as I need 6 pieces to build the game. Here is a PCB that makes up 1/6th of the main arena:
I designed the shape of the PCBs with FreeCAD, which was a lot easier for a custom shape then KiCAD. The resulting shapes fit the maximum size of a prototype PCB. In between the PCBs there is just about enough empty space for the power barrel socket to power the game.

Although it would be possible to make this PCB at home, I opted for a professionally made one by PCBWay. I have used them in the past with success and I knew that the PCBs I order would turn out great. The ordering process was smooth, and within 24 hours of ordering, the finished PCBs were handed over to the post. The PCBs arrived in perfect condition, with plenty of protection around them. The soldering pads were all clean and soldering was a breeze, no cleaning of the PCBs first was necessary. And get this: I ordered 10 PCBs, but, as usual, I got more in the box. This time, again, I got 11. Awesome! If you also want your own custom PCB professionally manufactured, click on the picture to the left and order your PCBs today! Or click here to order your PCBs for your own Ludo boards!
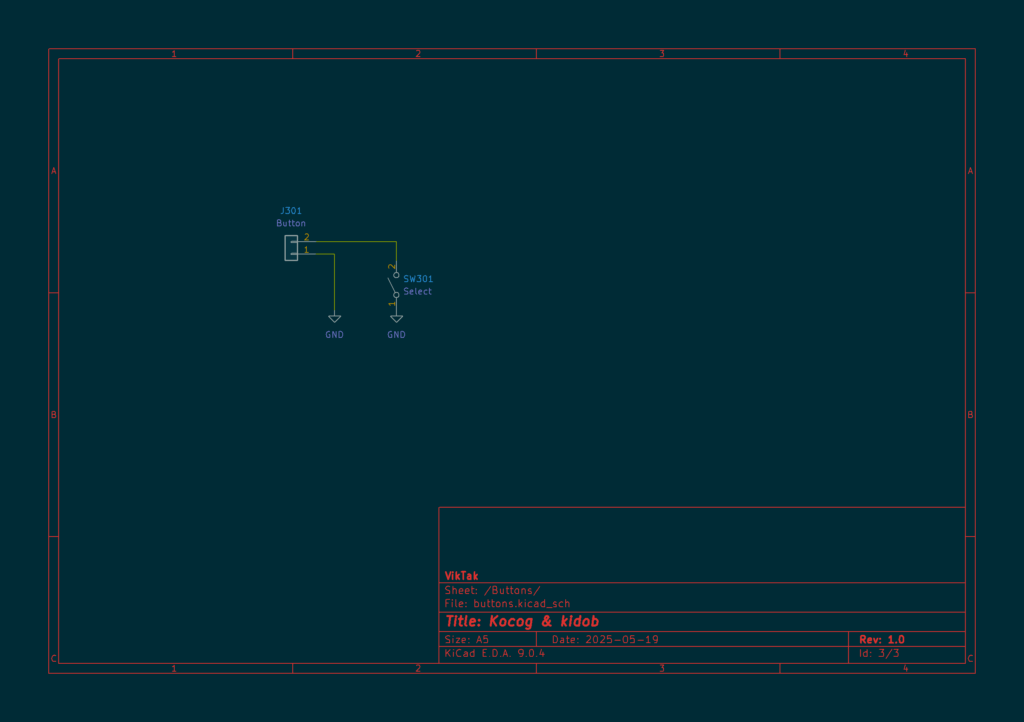
After a lot of deliberation and experiments, I ended up with having only a single push button per player. That is all one needs to interact with the game. This minimalistic design saves space on the PCB and makes it simpler for people to play the game. For the exact use of the buttons see later in this article under gameplay.

3D printed enclosure
One of the constraints of the project was that I wanted to be able to print the enclosure on my own 3D printer. This gave me the outer dimensions of the board. I decided to make it a round board, as opposed to the rectangle one in the original, because I never liked it like that: the physical board is square shaped, but the track is all kinds of different shapes – depending on the number of players: rectangle, pentagon or hexagon shaped. I think a circle is a good choice for this board game. It may have been a poor choice for the old, paper or metal based boards, but for 3D printing it just makes sense.
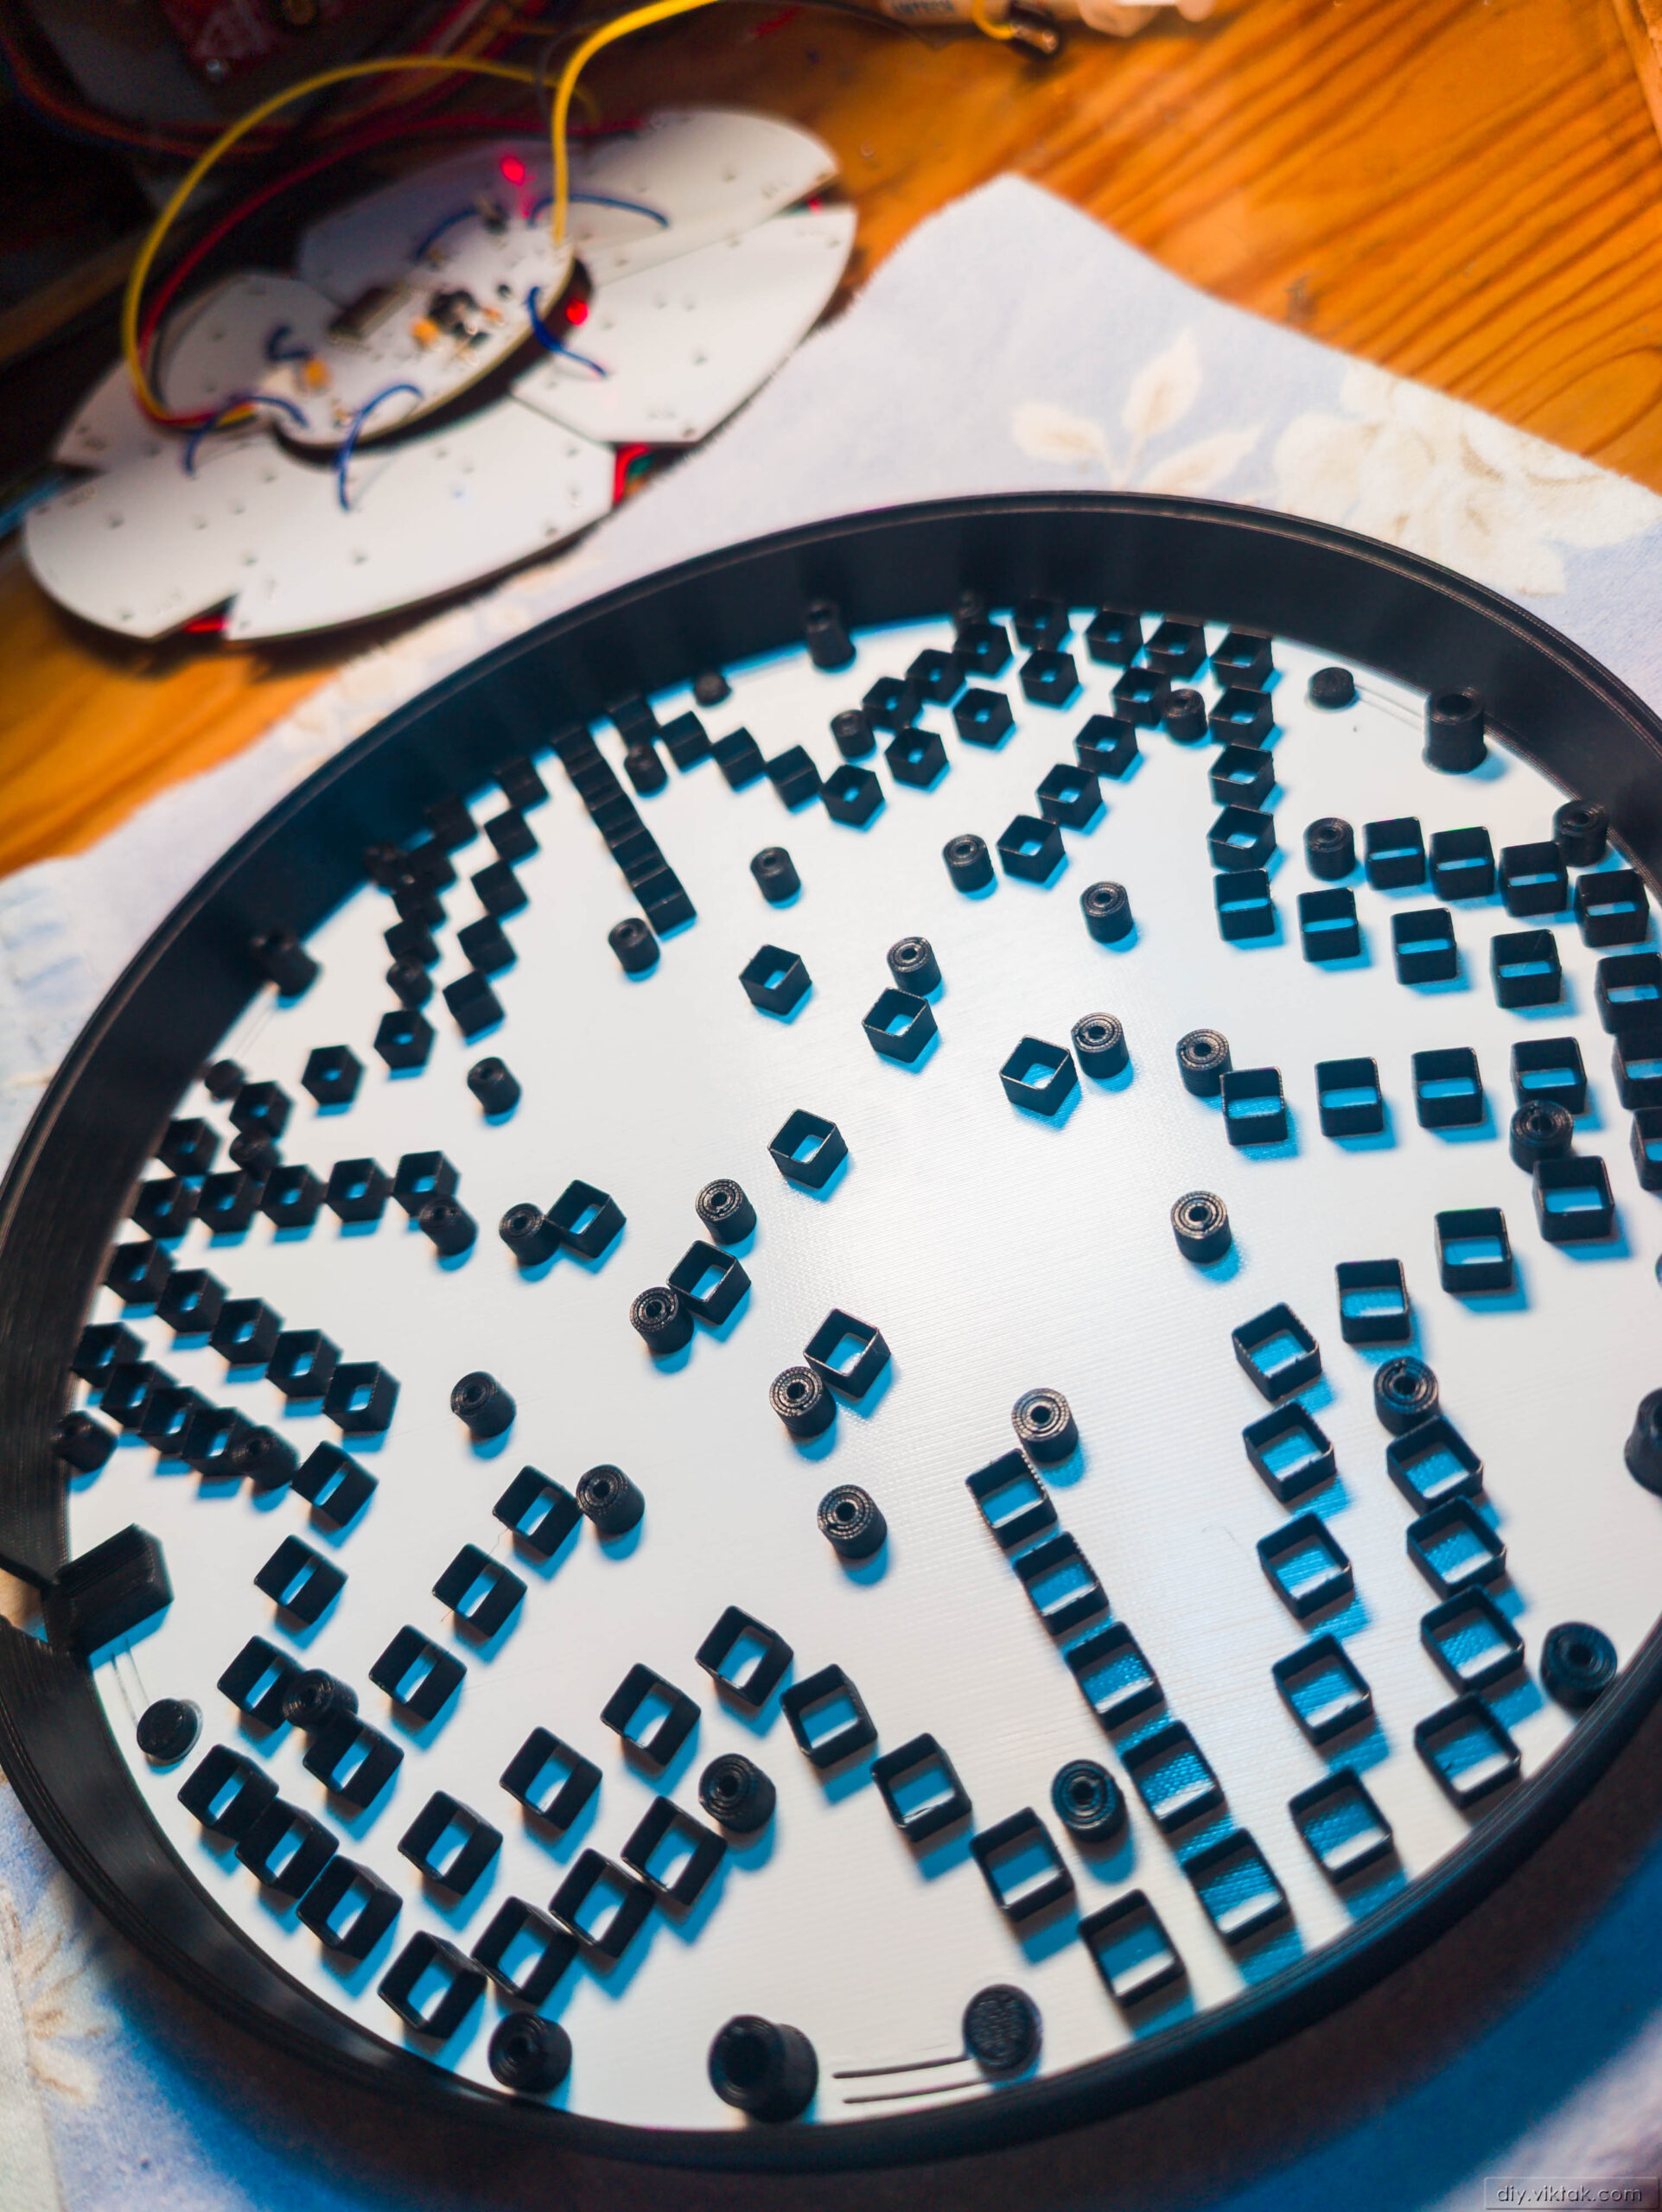
I designed the enclosure in FreeCAD. The enclosure is made up of two pieces: a front and a back piece. The back piece is a simple one: no special features, it simply covers the rest. The front one is where all the magic happens. From earlier projects, I knew that I wanted to use a thin, white front face where only those positions are visible that are lit up. But right behind it I needed to limit where the light from each LED goes. This means I had to print some tiny “compartments” around each LED out of a black material (to minimize light pollution elsewhere). I do not have a 3D printer that can change filaments on the fly, so I resorted to changing the filament manually once the thin front plate was printed, so the rest of the print could happen in black. This is how it looked on the inside after finishing the print:

Here are renders of the enclosure, front and back:
On the front panel (above) there are six cutouts for the buttons, one for each player. They also have a longer spacer, so that they reach the SMD push buttons on the PCBs. On the side there is just enough space for the barrel socket.
On the back panel you can see a place to reset the device and two tiny holes to inspect the power and Wi-Fi LEDs, just in case. In normal operations they are not needed, so I made them very subtle.
You may notice that there is only space for 5 mounting screws – one seems to be missing: Indeed, it does. In its place we have the power barrel socket. Unfortunately, there was no other possibility for the power connector. All is not lost though, as even 3 screws hold the game together perfectly – five screws include plenty of redundancy.
Finally, after playing several rounds extensive testing, I felt the need to add some silicone pads to the buttons: Since the 3D printed enclosure was very smooth (buttons flush with the whole surface), it was quite challenging finding the spot to press. Adding these pads made it possible to play the game without paying attention to “Where do I press this thing, again?” Gameplay just became fluid. And while at it, I also added some of these pads to the bottom of the board, so it doesn’t “wander around” during an intense game!
Finished product
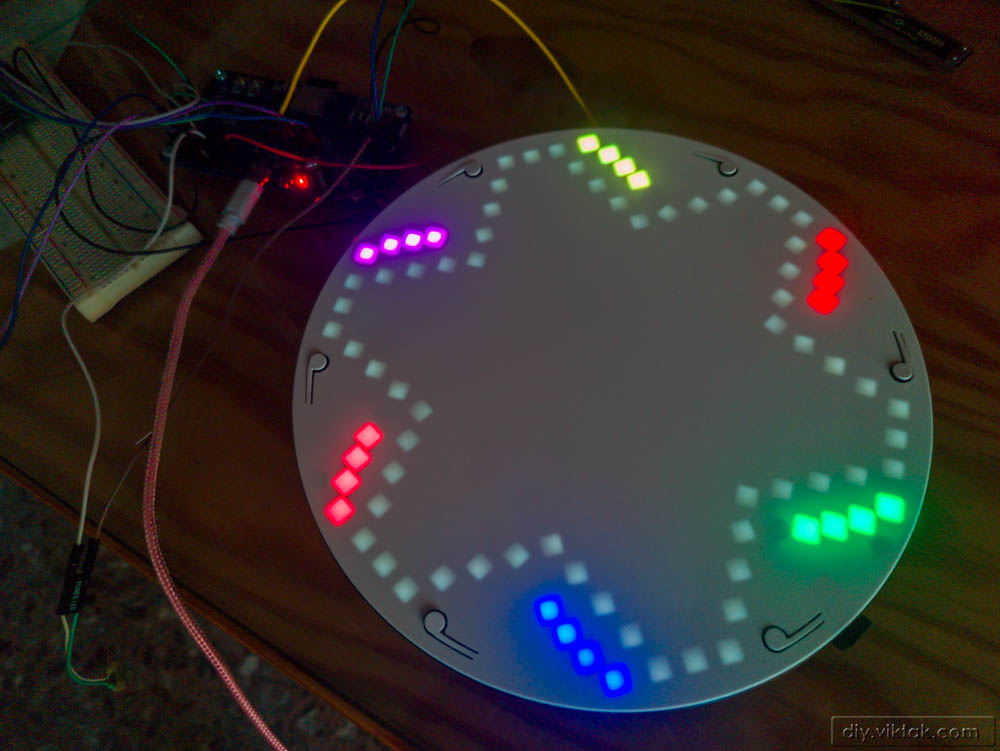
After all parts assembled, here is what it looks like at the end, ready to play:
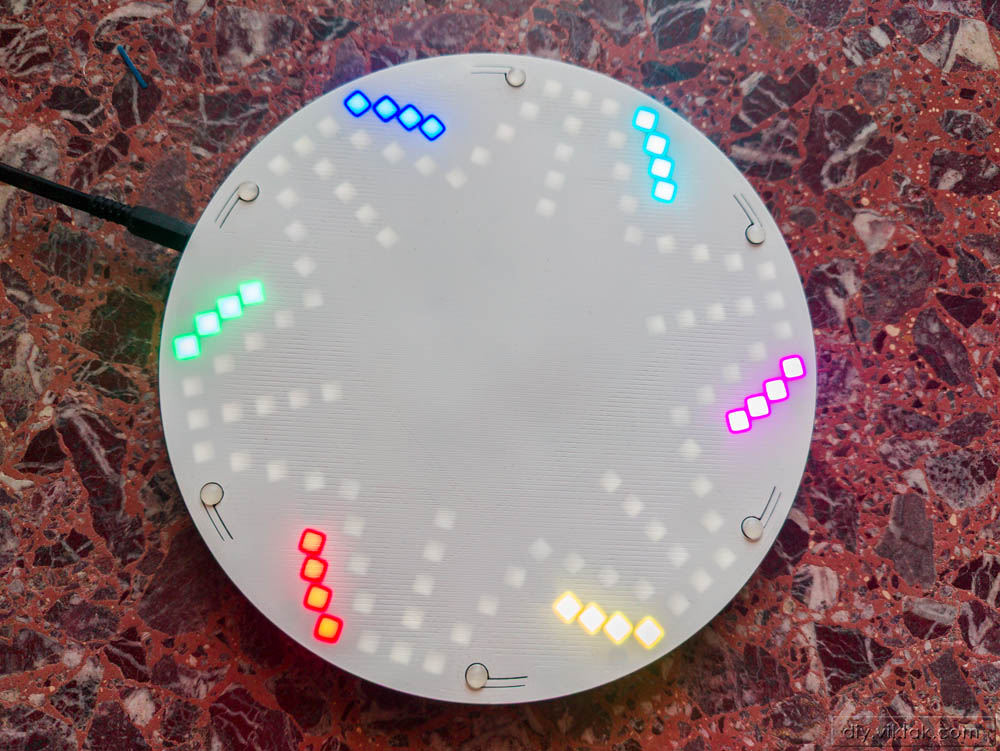
The board looks much better in real life. I couldn’t find a good way to photograph it using my phone and a webcam. In real life, the surface is white and smooth, the colors are bright, but soft. The game can be easily played in daylight (not in direct sunlight, but a well lit room is perfect) as well as at night.
Powering the device
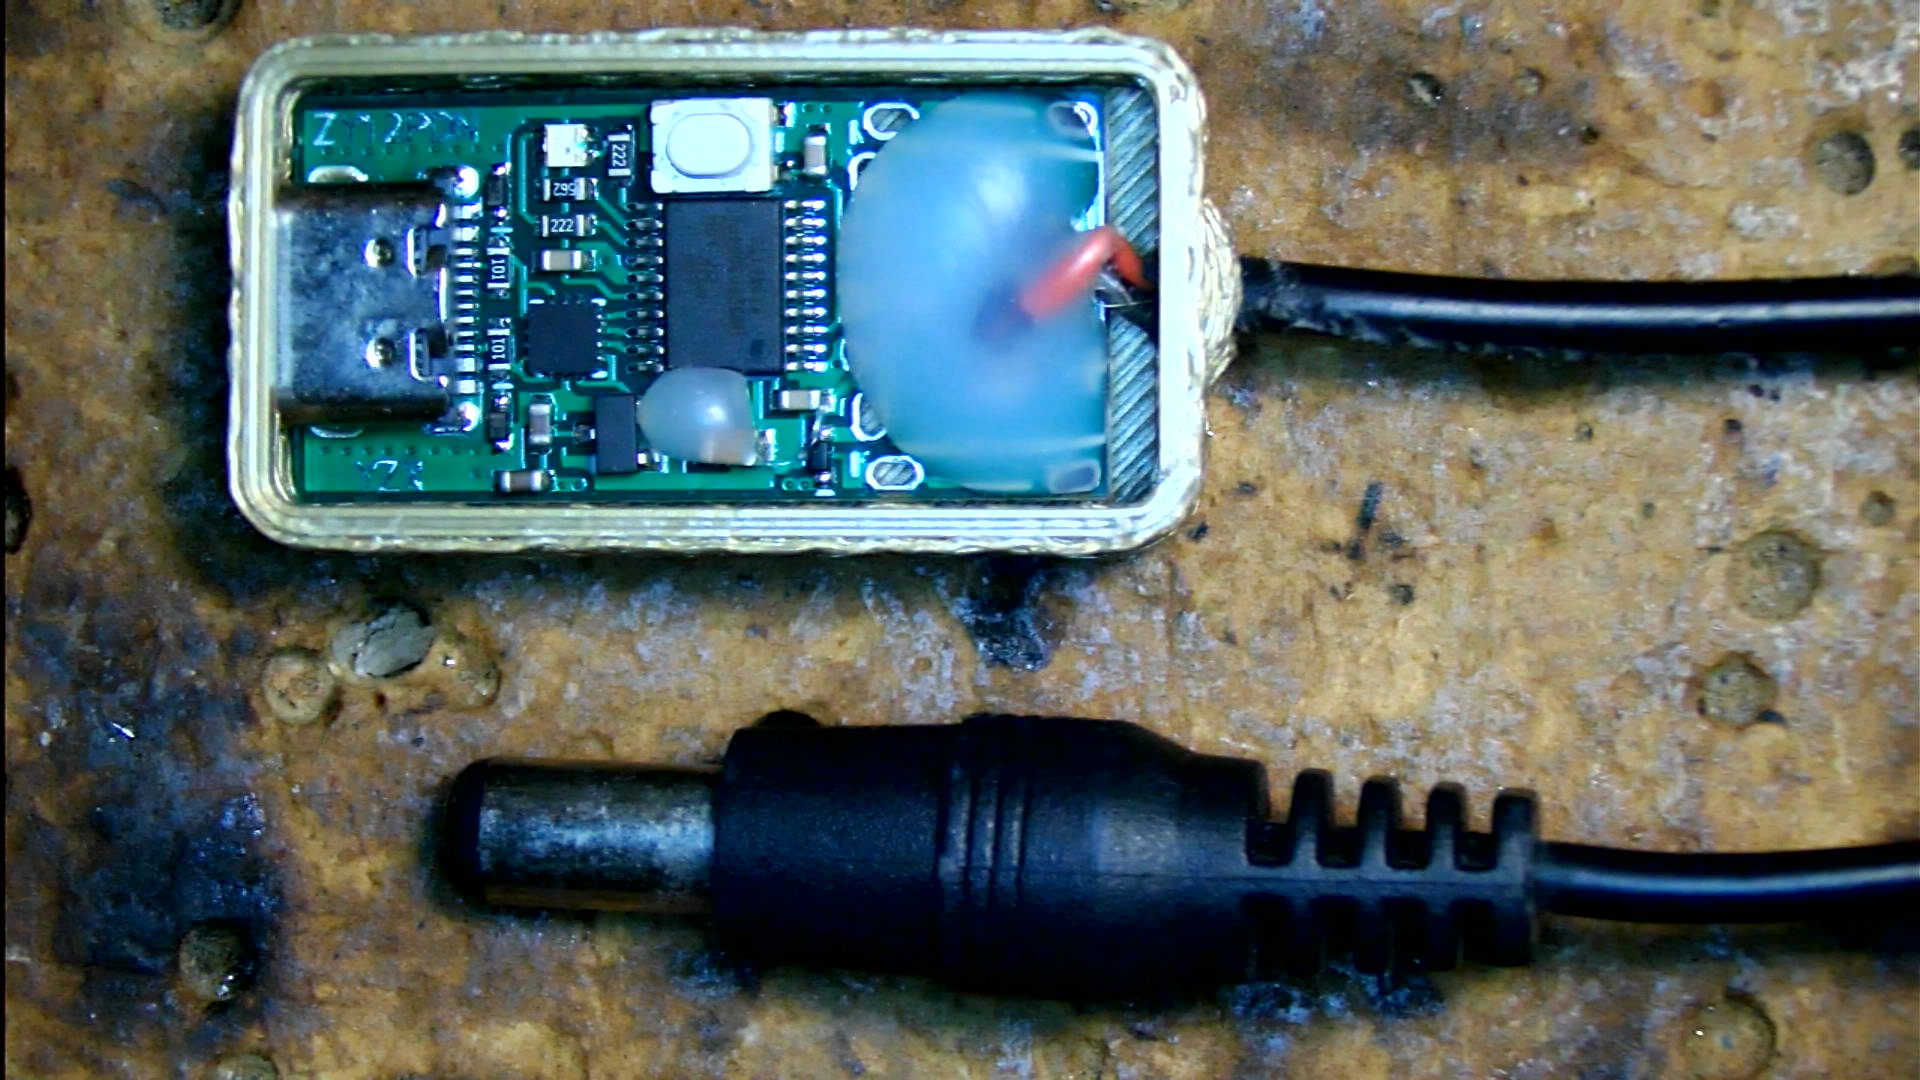
As mentioned earlier, the game operates on a single DV power supply. For various mechanical constraints I couldn’t integrate a USB-C connector, so I used a traditional, 5.5 mm barrel socket. This is acceptable, because it is a very reliable connector. There are many cheap power supplies that can be connected without any modification and is also virtually indestructible. However, these power supplies usually need a mains socket, which is usually available at home, but not on the go. So I had the idea to use a simple USB-PD adapter (the one you can set up to provide any of the supported voltages of a PD power supply. Here are a few such modules.) This not only allows powering the game from any ordinary phone charger produced in the past 20 years, but also from a standard power bank. This way the game is portable. You can play on the bus, train, in the car, even in the air. Well, at least at the airport while waiting for your connection. I created a small 3D printed enclosure for it – the whole thing is smaller than half of a match box:
Gameplay
The gameplay I implemented closely follows the original board game. As mentioned earlier, Ludo is a turn based game for 2-6 players. When the device is powered up, it tries to connect to the last Wi-Fi network it connected to successfully. If a connection is established and an MQTT server is configured (see about it a bit later), then the advanced features (such as save/load game, statistics generations, etc.) are available. If there is no Wi-Fi connection, the game still can be played.
Either way, the rules can be configured using the device’s own built-in web server. At the moment I only implemented two configurable options:
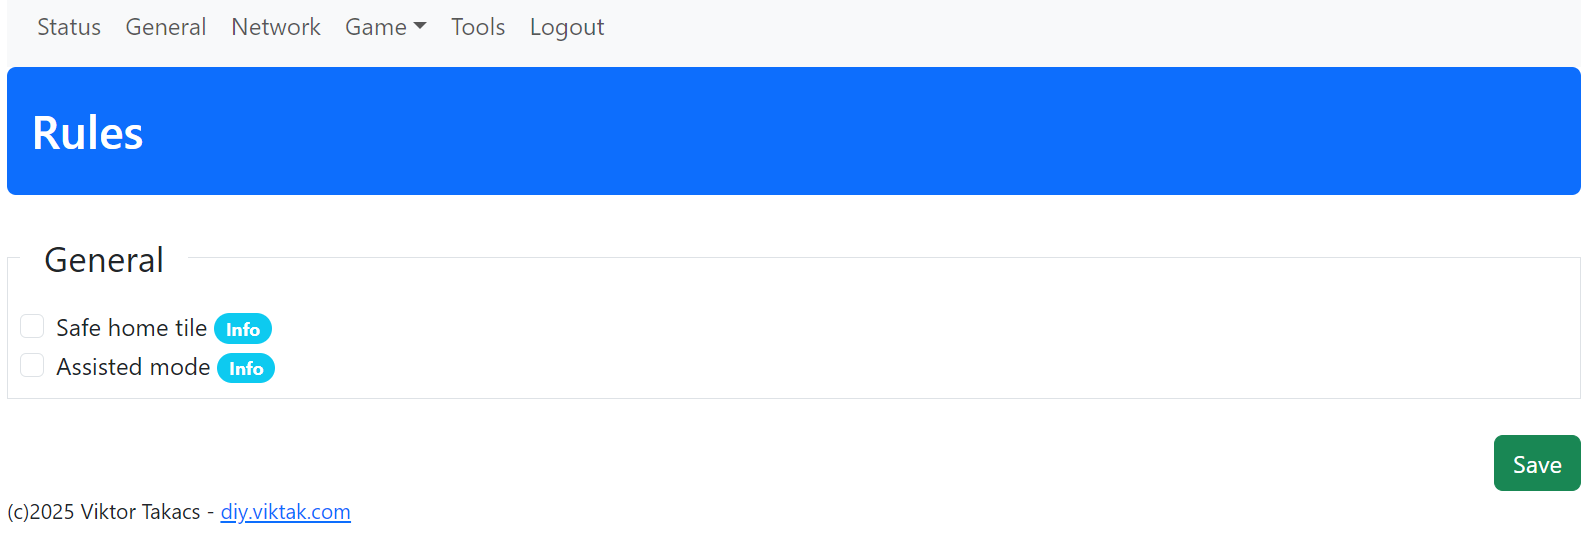
Explanation:
Safe home tile: If this is checked, then a player’s token is protected on the tile where the token entered the game. If left unchecked, the token can be kicked out on the tile where it entered the game.
Assisted mode: If this is checked, then after a player has rolled the die, the target tile(s) of all possible moves are highlighted and such the player must choose a destination. If left unchecked, then after a player has rolled the die, the tokens able to move are highlighted and the player must select a token to move.
The two rules are independent of each other.
Apart from the rules, the players’ colors are also configurable in the same manner:
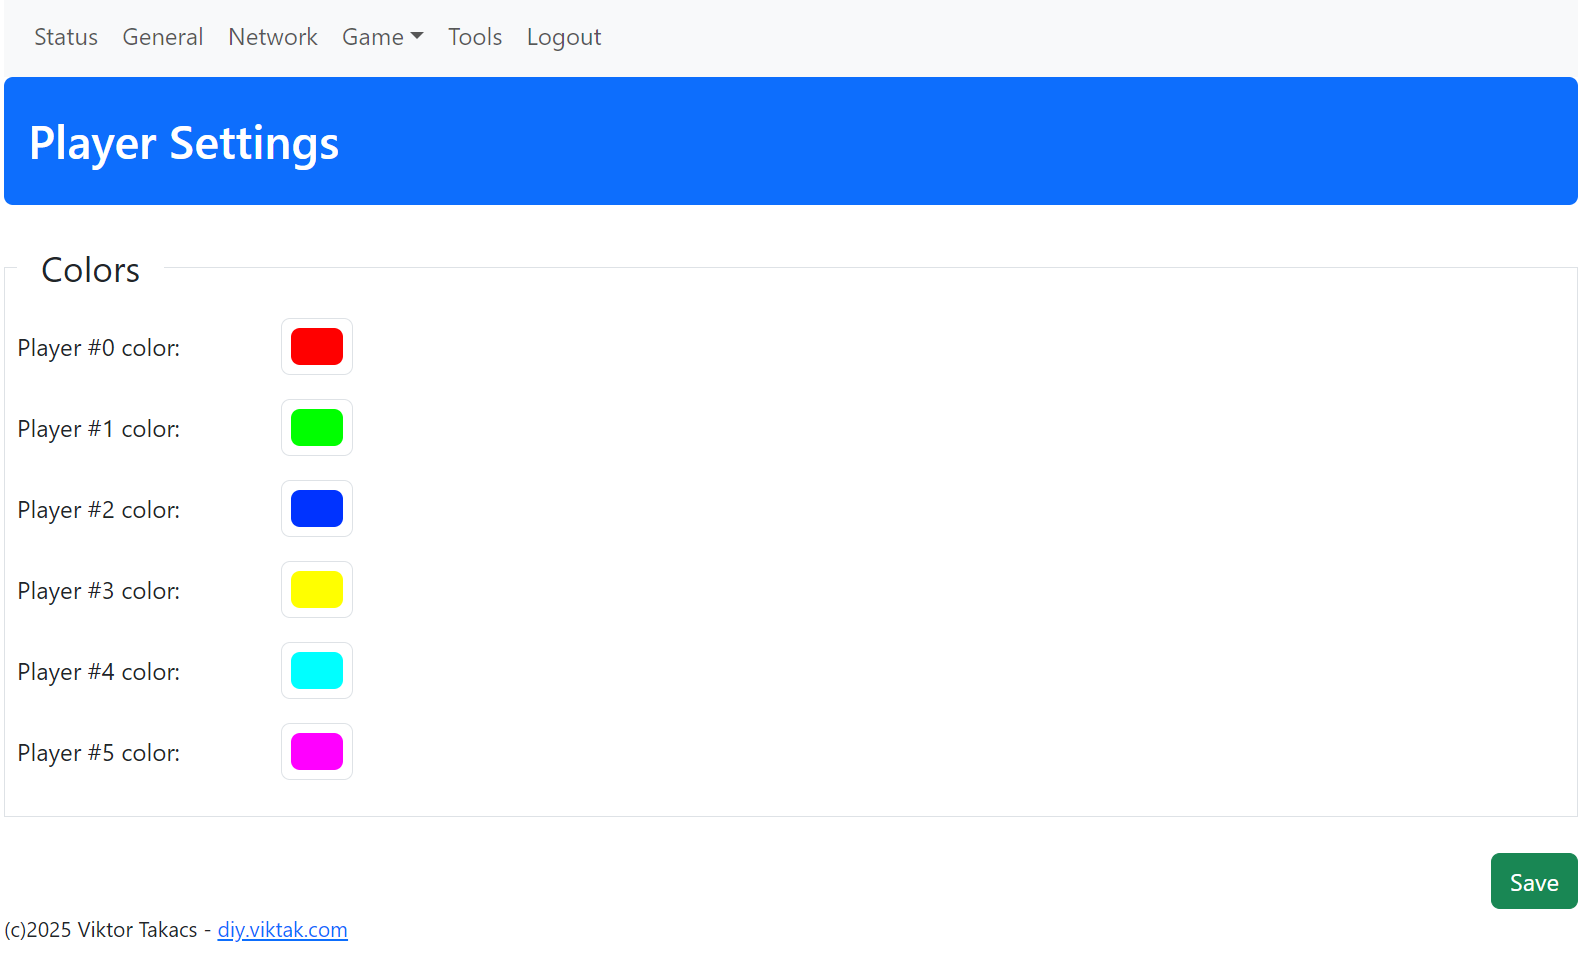
Each player has their respective color picker. There is no check or protection against two or more players setting up the same colors. It is the players’ responsibility to pick reasonable colors. Also, as much as it is tempting to set some exotic colors of the millions of possible colors, most of them simply don’t make sense on an LED display like this.
Both the colors and the rules can be changed at any time before and during a game (although it doesn’t mean you should…) 🙂
So, back to gameplay: Say the colors and the rules are set up, the next step is to select how many and which players are going to play. This is done by each player who wants to play pressing their button momentarily (single click). Each single click toggles the player’s tokens in their garage positions. Once all the players who want to play are activated (their tokens shown) all the players must press their button at the same time. This confirms, that player selection is done and the game starts.
At this stage the game enters its normal flow, players taking turn. The first round will be played by a random player. In any subsequent turn, players will take turn in a clockwise manner.
Each round has the following flow: A player’s turn starts automatically when the previous player’s turn is over. This is signified by the automatic rolling of the die. The die continuously rolls until it is stopped by the player. To stop the die a player must single click his/her button. A random die roll is then displayed on the die.
If a player has no moves, the die flashes quickly a few times indicating that there are no possible moves, and the round is over.
If the player has only one move, then – depending on the rules – the possible move will be highlighted by slowly flashing tiles. A long click on the button confirms the move.
However, if the player has more than one move, then – depending on the rules – all the possible moves will be highlighted by slowly flashing tiles. In this case the player first needs to select which token to move. This is accomplished by single clicking his/her button a number of times to cycle through all the available options. When the desired move is highlighted, again, a long click confirms the move.
The selected token now moves step by step to its destination. If there is already an opponent’s token, that token is now kicked out of game and it is reset to its garage.
If a player rolled a six, he/she has another round to play.
The aim of the game is to get all of one’s tokens from the garage to the finish positions. At the beginning of the game each token starts from the garage. A token can only enter the game in the player’s own home position and only by rolling six. The player who has all his tokens in the finish positions first wins. Of course, the rest of the players can still continue the game for 2nd, 3rd, etc. places. Every time a player finishes the game (his/her last token arrives to its finish position), a small animation is played as a reward!
Advanced features
I have also implemented a number of more advanced features to elevate the user experience of the original board game. Let’s go through some of the ones I have already implemented:
- One of the most desired features was to be able to save and restore a game. The way I implemented this is this: at the end of each round the game sends the current state of the game as a single MQTT message to an MQTT broker. This message is sent in such a format, that sending it back to the game (almost exactly) will cause the game to load that state and continue from there. This feature is already implemented and works, however, the message needs to be sent manually, i.e. I have no user friendly way of doing it yet. I myself am not going to use this very often, so I haven’t done it yet. If there is enough interest, I will develop this feature fully in the future.
- Another feature that I always wished for (and because it was not available in the original board game – for obvious reasons) is to get statistics of the game at the end. After a heated game all players feel the others had better rolls, i.e. more sixes, etc. To settle the debate, someone had to keep notes of all the rolls, which was very error prone. In the heat of the game some rolls were jotted down incorrectly, sometimes not at all. Maintaining statistics is trivial for a computer, so with minimal effort I could extract numerous statistics from the game. So questions like “Who rolled the most sixes?” or “Who kicked out whom the most?” are easily answered. Again, at the end of every round the game sends the full set of statistics to the MQTT broker. I also created a small NodeRED automation in my home automation to store those statistics in a MariaDB instance on my home server. Just like with saving/loading a game, I haven’t created a user interface for looking up statistics, but I am willing to do it once I will have enough interest.
Having played this game a few times since I created it my wife and friends, we came up with a few more feature requests. I might make them happen in the future too:
- Being able to re-play the whole game: This means, that instead of rolling the die randomly, the same rolls should be happening, allowing people to see if a different strategy helps winning the game.
- Team play: players on the same team shouldn’t be able to kick each other out. At the moment, for example, when there are only two people playing, to make things more interesting they can command, say, two sets of players on the board. However, in the current setup, if a token has no other choice, it will kick out its own team mate, if it is a different color. Trust me, this is also fun – ask me how I know this! 🙂
See it in action
Here are a few short videos to demonstrate gameplay:
Open source
This project is fully open source, the files needed to recreate it can be found in its own repository.
Competition
If you read it so far you probably liked this project. If you liked this project, please consider voting for this project in the upcoming competition at PCBWay. Simply click this link, scroll down a bit then click on “Vote now”. Thank you!

Pingback: Including Electronics To A Traditional Sport - The TechNews
Pingback: Adding Electronics to a Classic Game - News Hub
Pingback: Adding Electronics to a Classic Game – The Latest News!