Introduction
Recently, I finished my first, usable IoT prototype on a breadboard. It is a simple unit, consisting of an LED (emulating a digital output) and a switch (emulating a digital input). Many of the IoT applications can be traced back to this simple application, so even if a particular application needs more than the capabilities of my prototype, the processes, methods, modules and practices described below are likely applicable to any IoT application/project.
 |
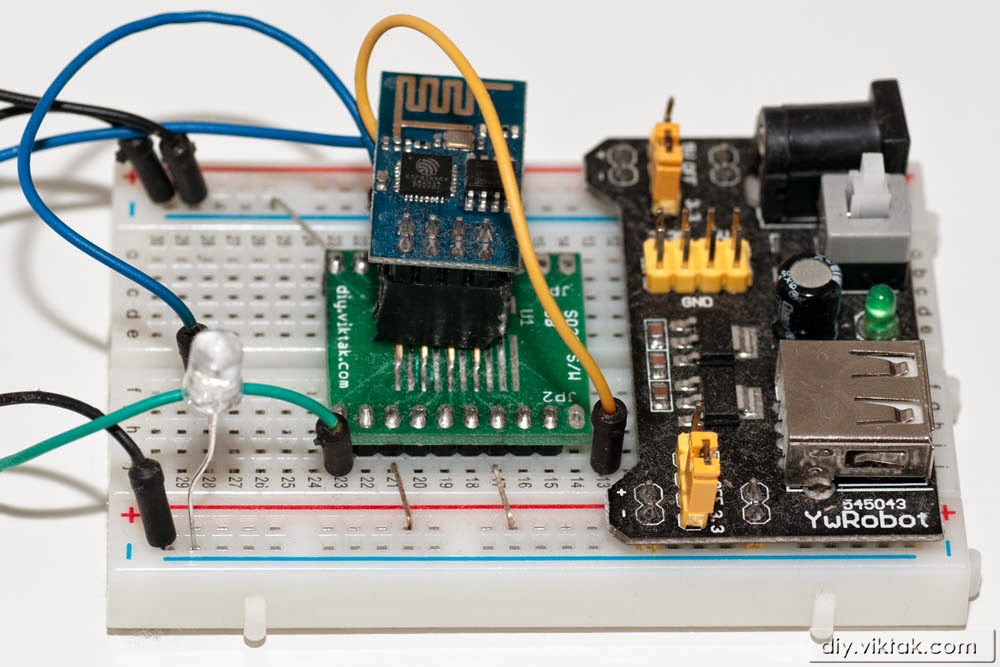
| The ESP8266-01 on a breadboard, complete with power supply and some simulated environment (LED, button). |
Architecture
My prototype consists of a few parts only:
ESP8266 module
This is the heart of this IoT. It provides a few IOs to use it as an endpoint switching something (i.e. lights, relays, engines, taps, etc), and/or collecting data about the environment using sensors (i.e. motion detector, temperature sensor, etc). It also provides WiFi connectivity, which means it can be easily controlled remotely using a web page and/or a mobile/desktop application through a local network or via the internet.
 |
| ESP8266-01 |
There are several types of ESP8266 modules available on the market, all for a very low price. In my prototype I used the 01 flavor.
USB-COM adapter
 |
| I used this USB-UART adapter. It was plug and play under Windows 8.1 64. |
 |
| Although it had a 3.3V output it turned out to be insufficient for the ESP8266 module. Later I realized this USB port of my PC has a problem. It works perfectly on other ports/computers. |
To program the ESP module I used a cheap USB-UART adapter purchased on eBay. Pretty much any adapter will do, but some need some extra work to get them working under Windows 8/10.
 |
| This adapter uses the HX verion of the Prolific chip, so the latest version of the driver doesn’t support it under Windows 8/8.1/10. |
In a nutshell: Most USB-UART adapters on the market are Prolific PL2303 based. This chip comes in different flavors/revisions, i.e. HXA, XA, HXD, EA, RA, SA, TA, TB. The latest Windows drivers available at Prolific’s web site do not work with the X and HXA versions as they are not recommended for new design – they only work with Windows versions up to and including Windows 7. If you happen to have one of these old chip adapters you can still get it to work under Windows 8/8.1/10 by installing a previous version of the driver. The one I was able to use successfully is version 3.3.2.102.
| The USB-UART adapter installed successfully in Windows 10 64 bit |
Power
The ESP8266 module uses 3.3V for normal operation. For testing purposes I used a breadboard power supply module. In a final application/product a dedicated LDO linear power regulator could be used, such as the LP3872EMP-3.3.
Back end
To manage/coordinate the interaction between the device and any controlling/monitoring applications (i.e. web page, mobile app, etc) I chose MQTT, a machine-to-machine (M2M)/”Internet of Things” connectivity protocol. Using MQTT I can now monitor and control IoT devices in, virtually, real time.
In the grand scheme of things I want to implement a home automation system running an a Raspberry Pi computer, so I chose an open source implementation of an MQTT broker application, called Mosquitto. The Mosquitto broker is ideal for beginners, as there is a test Mosquitto broker set up at test.mosquitto.org, which one can freely use for experiments. I also started by subscribing my ESP8266 to the test server. Everything went just fine for the first try – I can recommend it to everyone.
Once my code was running fine using the test server, I created my own private Mosquitto server on a Raspberry Pi. About installing Mosquitto for the Raspberry Pi see this separate article.
Firmware
The ESP8266 chip can be programmed in a variety of ways of which I picked the LUA language for this project. I have programmed the ESP8266 with the LUA firmware, in fact, when power up it spits out the following message:
NodeMCU 0.9.5 build 20150214 powered by Lua 5.1.4
To write the custom code I used ESPlorer v0.2.0-rc1, which is a tremendous help in developing in LUA for the ESP8266.
The LUA code I created is available on request.
Monitoring/Controlling
To test all the features I wanted I created a simple web page at http://viktak.com/esp. If you think it’s very similar to http://test.mosquitto.org/ws.html you are right. 🙂 I took most of it from there, and applied some formatting to it.
Also, I tried an Android app called MyMQTT which also worked nicely, but it’s too general for everyday use. I am at the moment learning Android development so that I can create matching Android apps for specific IoT gadgets.
Operation of Prototype
As I mentioned in the beginning, this prototype doesn’t do much, but it does things fast and convinced me that it is relatively easy to create real life IoT applications that work in real time.
My ESP8266 prototype project requires that a properly installed/configured and running MQTT broker is available to it.
Functions
When powering up the device, it first connects to the WiFi network that is preconfigured in its LUA firmware. This (configuring the ESP8266 where to connect) only needs to be done the first time. Any subsequent times it will remember the SSID, user ID, and password. (An interesting fact I observed is that after power up the device connects to the WiFi network in less than a second.)
Once it’s connected to the network it tries to connect to the MQTT broker. Also, whenever it looses the connection to it, it keeps trying to reconnect until successful. When the connection is made it publishes a message notifying other devices that it is now online.
After a successful connection to the broker, it subscribes to a test topic. (This is the way the module can receive and act on commands from a remote user.)
Once it receives a command, it executes it. At the moment, the following commands are available: Led_ON, Led_OFF, Led_TOGGLE.
Also, whenever the on-board switch is toggled, it publishes a status message in the test topic.
Finally, when the module goes off-line for any reason, after 60 seconds the Mosquitto broker publishes an automatic message letting all subscribed devices know that our little device is not online any more.
The following screenshot demonstrates the basic messages that control/monitor the functions of this prototype:
| Mosquitto running on the Raspberry Pi |
In addition, my current (test) code also spits out debugging messages about what it is doing at any given time on the serial port to aid development/debugging.
Next steps
This prototype is a good starting point to develop it further to handle more and different types of sensors and handle more and different types of real life devices.
Also, when used in a non-private environment, such as the internet, security should be implemented on the MQTT side of things, i.e. only authenticated clients should be able read/write the MQTT broker.
I will explore these options in the near future, so check back soon for updates!


