Introduction
The method described below is valid for any remote control that uses conductive rubber pads for buttons. I have successfully used the same method on TV/VCR/Home theater/AC remotes and game consoles. Some time ago I decided that the next time I do it I would document it here.
Recently, I ordered an extra controller for my XBOX 360 so that when my nephews and nieces come over they can play at the same time. The controller was advertised as a brand new, original controller from Microsoft. Well, it turned out it was an original, but far from being brand new. It must have been used extensively because all the buttons had to be pressed very-very hard to register. This is caused by the rubber conductive tips of the inside of the buttons wearing out after a lot of use. (For comparison, the controller that my XBOX 360 came with is still in top condition even though I have been playing with it for years.) Since it’s difficult and expensive to negotiate a return and replacement of product from overseas, I decided to fix it on my own. I have done similar fixes in the past with some remote controllers in the past.
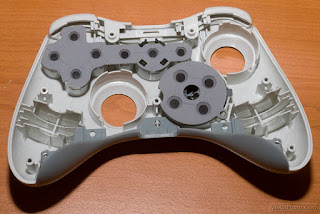 |
| Those black “dots” (11 total) are the ones that had to be fixed. |
Tools and materials
- A Torx screwdriver – I got mine from eBay for 1USD.
- A few cm2 of aluminium foil – had this in the kitchen.
- A paper puncher – had this in my home office.
- Some glue or double sided tape and scissors – had this in my home office.
- Optional: 10cm sticky tape – had this in my home office.
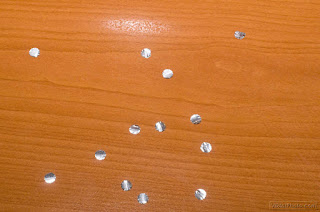 |
| Aluminium foil circles made with a puncher. |
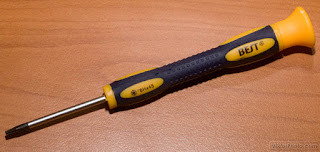 |
| Torx screwdriver. |
Procedure
- It is a good idea to put a stripe of sticky tape of some sort on the controller covering all the buttons before we start. This is not strictly necessary, but will save some time and frustration later, when you want to put the whole thing back together and the buttons just don’t want to align.
- Flip the controller upside down. Remove all the screws that hold the controller together. There are seven of them – 3-3 on either side and one under the serial number label in the battery compartment. If you remove this label carefully, you can put it back after you’re done, if you like.
- Gently pry the controller open.
- You can see the two small electric motors on either side that provide the force feedback. These are attached to the controller PCB with a small connector. To make the following tasks easier you can disconnect these and remove the motors temporarily.
- Use the paper puncher to punch 11 little circles from the aluminium foil.
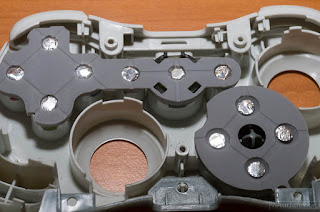
- There are 11 conductive pads that need fixing – Buttons A, B, X, Y, BACK, START, HOME, DPAD. Put a tiny little drop of glue on the conductive pads, or if you don’t have glue, make 11 tiny little pieces of double sided tape and attach one to each conductive pad. This time I did this as I couldn’t find the glue…
- Place a little circle of aluminium foil made in step 5 on each conductive pad. The aluminium foil has a shiny and a matt side. I automatically attached the matt side to the glue since my gut feeling is that it bonds better with the glue. I may be wrong, I never tried it the other way, but it seems to work like this for at least a year in the remotes I have fixed with the same method, so I didn’t change.
- At this stage the fix is done and you can reassemble the controller. Don’t forget to reattach the force feedback motors if you took them out at the beginning…!
More pictures
|

|
| The two feedback motors are easy to detach from the main board. |
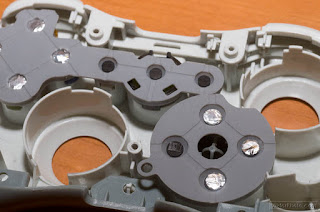 |
| Some pads already got their new “hat”. |
 |
| All the pads are ready to go! |
Like this:
Like Loading...
Related


Cool idea! I'm a little worried about how long the tape will hold to the rubber though. Won't the foil eventually fall off and cause all sorts of false triggers? Super glue is definitely the way to go, like you said. I would also add its a good idea to clean the pad with alcohol first.
I used to use stuff like this in the TV repair business: http://www.mcmelectronics.com/product/CHEMTRONICS-CW2605-/20-3890
Essentially its some super glue and conductive paint. Next time I'm trying foil!
@Anonymous: I have used this method on a few occasions in some "high usage" equipments, e.g. TV remotes. I can't even remember how long ago I used it the last time and they all still work. If they stop working just go back to square one and do it again, it costs next to nothing. The glue you mention is probably the "official" stuff to do and is very good, but it's super expensive if you only have one remote to fix a year. For the price of this conductive paint you can get a new remote 🙂 Thanks for the tip though – it's good to have options!!
This glue may work
http://www.thinkgeek.com/gadgets/tools/b70c/
@Jon: Yes, another good solution. Thanks for sharing!
This is an excellent solution! Thank you very much for sharing this.
I wished I had thought of this when I was repairing my old GBA though. I ended up buying new rubber pads, which weren't easily found and were very costly.
In any case, at least I can fix some old PS1 and SNES controllers with this, I think!
Thanks again!
@Ted Mahsun: I'm glad you found this useful!
Definitely going through all my SNES controllers with this! Brilliant! Thanks so much!
You might even be able to just clean off the pads and see a a positive effect, right?
@Anonymous: Well, yes, that's kind of trivial. But my experience is that it only lasts for a few days. I don't know what/how those rubber contacts are created but they definitively wear off after a while. These aluminium "disks" seem to last a lot longer. I have no idea why they are not made like this in the first place…
Great! Thanks from Ireland! 😉
Very welcome! 🙂 Since I spent 8 years in Ireland this is a special welcome! 🙂
Elegant & simple. I repair marine electronics, this fix should take care of the faulty keypads on GPS receivers. Usually the cursor arrows fail first because they are used more than the other keys. Thanks for the tip!
Yes, the same technique can be used for GPSs as well as for all the devices that use rubber conductive pads as buttons.
I'm glad you found this helpful!
Have you tried using a pencil ? you could just "write" with a soft pencil on both the rubberpad contacts and the corresponding contacts on the board. Graphite is a conductor, so in theory works as well, and it's less invasive than sticking small foil bits on the rubber pads using glue.
I have tried this method on TV remotes for years and it works great.
I recommend you use "Copper Foil Tape". Same idea but much better contact.
Yes, I tried it on a couple of occasions but found that I had to re-apply that soon aftre as it wears out easily. The alu foil is more permanent. Whatever I fixed once I never needed to touch again. If the pencil method works well for you maybe you should share some more details as to what kind of pencil you used, e.g. hard, soft, etc. I would be much interested to use it too. I agree, it is less intrusive.
Yes, same thing, probably better contact, BUT: I don't have copper foil at home 🙂 Thanks for sharing!
Yep adhesive copper foil tape is the way to go – it is used for stained-glass work so you can get it from art shops. One problem with alu foil is that it will oxidize and stop conducting after a while.
Aluminum flue tape or furnace tape might work. There's two types, one has a paper backing to peel off, the other is rolled up without a backing like any normal sticky tape. To punch the dots you'd want the paper backed type.
I covered the spots on the side fire buttons of Atari 5200 controllers but they wouldn't stay on long, couldn't find a glue that would stick really well to both the aluminum and the soft plastic of the buttons. 'Course that was back in the early 1990's.
repair shops just use pencils
i think it was an artist's pencil, dont remember the H.B.
the copper foil would rust just as fast as the graphite from pencil might fall off.
ever used bits of bare copper wire as a "pin"/"connector" replacement?
notice how it starts to turn dark brown and get glitchy like nintendo? (original 1987-1989)
pencil graphite powder wont short it to he11 …
measure the resistence yourself! or check out a childrens book on basic electricity… there is a pencil expierement… fun 🙂
but foil… instant short-circuit.
THE CUSTOMER WILL NEVER COME BACK AND MIGHT TALK MALSH.. ABOUT YOU OR EVEN SUE FOR PERMENTALY DESTROYING THE REMOTE WITH A PLANNED/TIMED DEATH! (1 year?)
DONT BE A COMMERCIAL A..H..E WITH PLANNED DEATHS!
let it be repaired later again for sure!!!!!
that and i found that 9 out of 10 times it wasnt the contect wearing out, it was the HUMAN-OIL insulating the contact, usually very gross, take the ENTIRE unit, circuit board and all and wash each seperately with tap water and mild BAR soap, not liquid soap, just bar soap.
and be GENTLE TO THE CONTACTS! or youll ruin em quick. works wonders on 9 out of 10 remotes/phones/GPSs/ect and the other 1/10 use a pencil after soap & double rinse 🙂 20$/repair times 10 remotes a week gets you 200$ a week on JUST THE REMOTES!
F**** the manufacturers that say repairing is stealing, its already bloody paid for! (*&%&^%$*(&%! *(&*%*&%~!
but dont wash the "force-feedback" motors or any oiled bearing… JUST the normal plastic, rubber, and circuitboard, but dont scrub the circuit board button contacts, trust me ive ruined many that way. they know we try repairing so they make it extra delicate.
end of button rant
have fun with your like new remote 🙂 every time
I will definitely try this method if I can find it in an art shop, since so many recommend it!
What do you mean by bare copper wire as pin replacement? Can you please elaborate on this? It sound interesting….
and finally: I don't do this commercially, so customers sueing me for this is not a real threat… – I only do it for myself and for select members of the family 🙂
Yes, I forgot to mention this in the article. I probably forgot it because the XBOX controller didn't have any human oil in it, but TV remotes are almost always full of grease which a good cleaning (with soap and/or alcohol) fixes perfectly. I tend to use cotton buds as an applicator to be gentle on the contacts.
Thanks for the reminder!!!
I fixed a couple 5200 controllers this way a few years ago. Super glued them on, still working 🙂
Cool, thanks for sharing!
Also available is a paint on epoxy rubber containing silver – but its expensive – made by chemtronics in usa
"circuitworks" rubber keypad repair kit
Thanks for the tip! Though at more than 20USD a kit it's a bit priceier than my solution, it's good to have another way of fixing remotes in our toolkit!
thanks
Will super-glue work ok? Is there a specific glue that I should use?
I don't know, but I don't see any reason why it wouldn't. You can always try 😉
So for those of us that read the comments for the extra bits….
The method I used was to stick double sided tape to tinfoil, peel the wax paper off and this make the foil into "foil tape". I then trim a small strip across the foil tape and crop this into three squares. For applying these squares … use a pin. I stuck the pin to the sticky side of the foil tape, lifted, placed and pressed it down into each of the button crevices. Once I got going it was so quick I did the whole remote even the buttons that are still working. Ha!
I was ready to toss the remote and try to find a universal remote that would work (already tried 2 that didn't).
I used contact cement applied to the pads with the end of a toothpick. Let it dry just a bit, as is the norm with this type of cement, and then stuck on the aluminum foil bits. Seems to have worked like a charm.
Thanks for sharing!
SPI sells a similarly expensive silver conductive paint (not to mention an insanely priced platinum conductive paint), but also a much cheaper graphite conductive paint.
Woohoo! It worked and it took me 10 minutes total time. I used aluminum foil (Reynolds Wrap) and Loctite Super Glue Gel. I also used my ohmmeter's connectivity tester to test each conductive button contact to see if there was a potential problem. Only the Volume Up/Down buttons had an issue. Now to see how long the fix lasts.
Thanks!
Oh BTW, I fixed a Universal Remote TX-1000 remote control.