
Introduction
This project involves creating a bench supply from an old ATX power supply. The resulting bench power supply provides +5V DC, +12V DC, and, optionally, a variable voltage ( +1.25V .. +10.3V DC) power source for the hobbyist.
Probably a good beginner’s project, since this project is, although a bit time consuming, if you want to do it nicely, very straightforward, hard to mess up. I had most parts already in my Big Basket of Junk: an old ATX power supply, a pretty large (electrician’s waterproof) plastic box, banana plugs & sockets, LED Volt meter unit, etc. I only had to get a small PCB done for the variable voltage part. Although I will include it in this page, if you only need 5V DC and 12V DC, you can skip the next part.
Variable voltage circuit

I found this basic circuit somewhere on the internet. I only modified it to contain an LED, meter, etc. It uses an LM317 in a datasheet configuration with only a few external components. It is able to provide current upto 1.5A from 1.25V to 10.3V with an input voltage of 12V (taken from the ATX power suply). I designed a dedicated PCB for the circuit. It worked for the first time. I also put a heatsink on the LM317, just in case. At and above 1A it starts getting hot.
This is the front view of the PCB I had made:

You can see it’s very simple – could be done easily at home if you are into this stuff.
Assembly
I had an electrician’s waterproof plastic box (the one that can be put outside in the rain) I had no use of. Although a bit too big for this project, it was easy to work with: since it is made of plastic drilling/cutting/filing it was no difficult. It also came with some holes or mounting points which made it easy to mount the different modules to it. Steps I took to build the power supply box:
1.Using the mounting holes in the box I mounted a piece of plexiglass that I had already cut to size – this made mounting all the other modules easy as I could drill mounting holes on the plexiglass whereever I wanted.
2.I removed the PCB from the ATX power supply. In this step I also desoldered the mains connector. This step is not necessary, but it saves a lot of space in the box.
3.I mounted the ATX power supply on my main board (see step 1).
4.Right next to it I mounted the fan of the ATX power supply.
5.I drilled many 6mm holes on the side of the box so that they are aligned with the fan.
6.I mounted the variable voltage module in the free area of the main board.
7.I created a weird shape hole at the back of the box for the mains supply connector salvaged from the ATX power supply. Although this hole came out perfectly (the socket did not come out on its own) I secured it with two screws, just in case.
8.On the front panel of the box, I measured and drilled holes for all the banana sockets, on/off switch, on/off LED, LED display, potenciometer I wanted to have. When ready, I populated the holes with the corresponding hardware element.
9.Last step is to wire up the “UI” with the “back-end”.
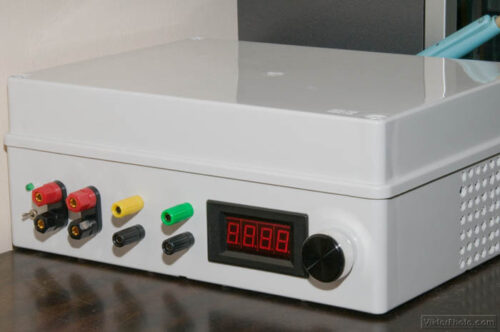
Finished look
This is my finished bench ATX power supply:
 |
| Front and side: you can clearly see the ventillation holes on the side. Not so clearly, or hardly at all, the display actually says something, but it’s not visible because of the flash used. |
 |
| Back: The standard computer mains cable connected |
 |
| Inside: The blue layer is main board (plexiglass). The plexiglass is transparent, but I left the blue protective foil on it, in case one day I want to repurpose it to something else… I also left all the cables coming from the power supply untouched. This way the power supply can still be used in a PC should the sudden need arose :-). |
 |
| Inside – UI: Here the connections are visible. |
Throughout the construction of this unit I color-coordinated/coded things – e.g. red cables/sockets/plugs are for 5V, yellow cables/sockets/plugs are for 12V, black cables/sockets/plugs are for 0v (or ground). This is in line with the color codes used with cables in a standard ATX power supply.
The whole process took me one day, including cleaning up afterwards 🙂
